Run your own Bitcoin Full Node on an Azure Linux VM
One year ago, I began my journey in the crypto and blockchain area. Recently, multiple circumstances made me thinking about my own crypto-related server. Of course, I choose Azure for running this server (for the time being). It has been a while since I last touched Linux, so I had quite a bit to refresh and learn. In this post, I’ll show you the steps that are needed for setting up an independent full node to support the Bitcoin network.
Setting up the Virtual Machine on Azure
First, we need to install the Azure CLI on our computer. We will use this one to connect to our virtual machine later on via SSH. Follow the instructions found here.
The second prerequisite is a program to generate SSH keys. You can use either the OpenSSH client shipping with Windows 10 (latest versions), use the Azure CLI or PuTTY (follow these instructions).
Create the VM
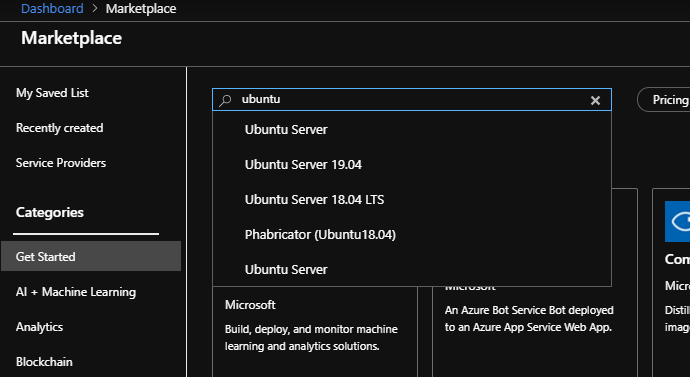
Once you have installed the CLI and your SSH keys are created, log into your Azure account. Go to the marketplace, and search for ‘ubuntu‘. Choose Ubuntu Server 18.04 LTS and hit the ‘Create‘ button in the next window.
 Fill in the details of your Azure VM on the first page of the creation module:
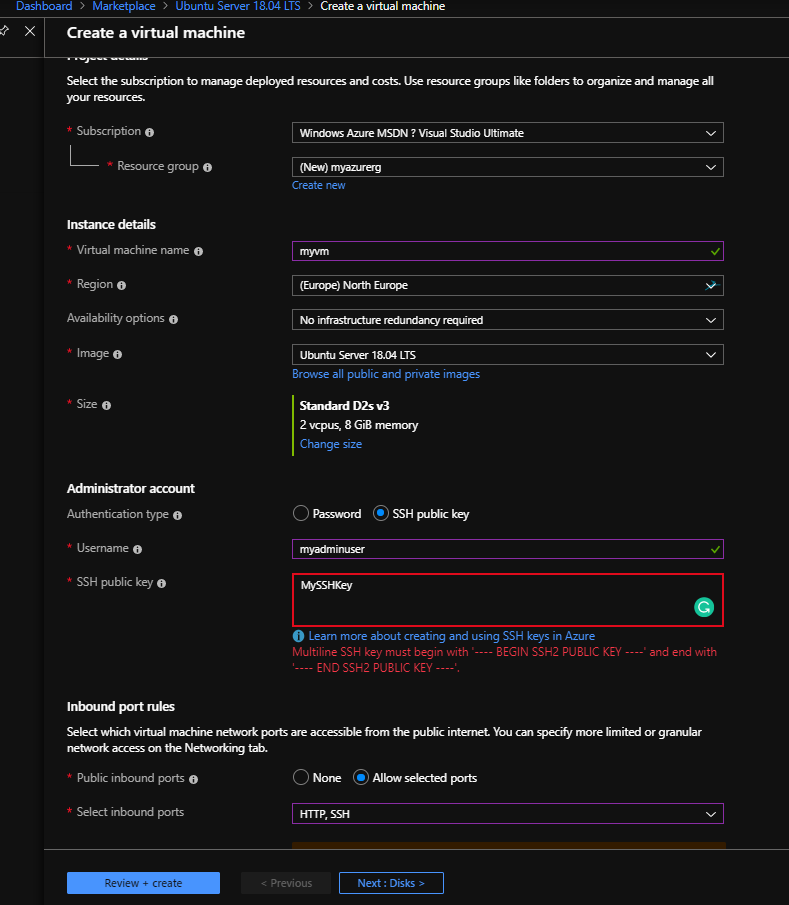 Do not forget to set the SSH admin user, as adding one afterward is not as easy as it seems and it often also fails (I had a hard time to learn that). Also, we need to allow traffic through the default HTTP (80) and SSH (22) ports. Once you configured everything, go to disks.
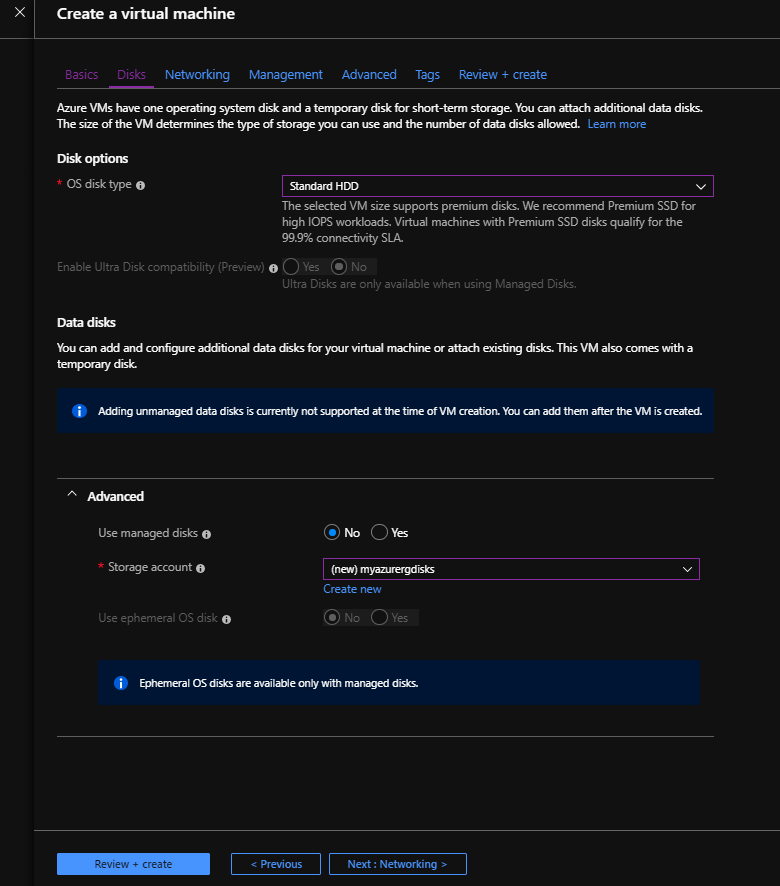 I did not select premium disks but instead went with a Standard HDD to save some money. You can change that to your needs. The important part here is to NOT use managed disks as we will need to resize the OS disk after the creation of the VM. Follow the rest of the steps in the creation wizard and create your virtual machine. Once the machine is created, you should create a DNS label (hit the ‘Configure’ link at the VM’s overview page to get to the IP settings).
Log in via SSH
Let’s try if we can log in to our Linux VM via the Azure CLI. Open the ‘Microsoft Azure Command Prompt‘ on your PC. To be able to connect to our virtual machine, we need to log in to Azure first to obtain an access token for our session:
1
 az login
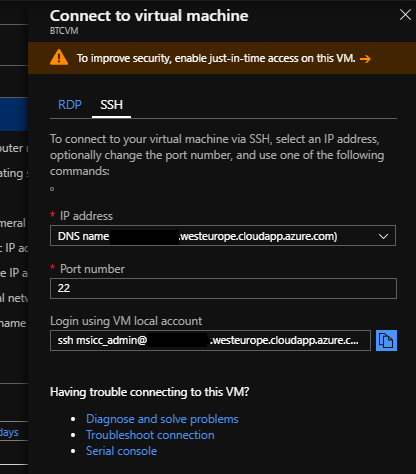
This will open a new browser tab, where you need to log in to your account again. After that, we will be redirected back to the CLI. Once that happened, go back to the overview page of your VM and click on ‘Connect’. This will open a pane where we will see the RDP and SSH connection option. Select SSH and copy the text below ‘Login using VM local account‘:
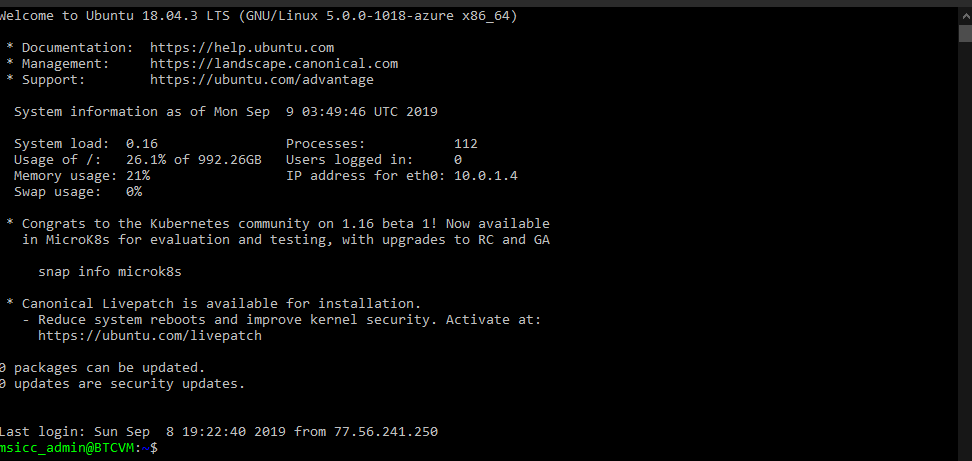
 Paste it into the Azure Command Prompt window and provide your password (you should never use a password-less SSH key). If your screen looks now similar to this, you have successfully logged in:
 Now that we have verified that we are able to log in via SSH, type
 exit to log out again as we have one step left to perform on the virtual machine.
Resizing the OS disk
A Bitcoin full node needs to download and verify the whole blockchain. The current size of the blockchain is around 250 GB, which would never fit in the default size of the OS disk of our VM. Luckily, it is pretty easy to resize the OS disk by running some commands in the Azure CLI.
First, stop the virtual machine:
1
 az vm stop --resource-group YourResourceGroupName --name YourVMName
Resizing the OS disk needs the VM to be deallocated (this may take some minutes):
1
 az vm deallocate --resource-group YourResourceGroupName --name YourVMName
Once deallocation has finished, we are able to resize the OS disk with this command:
1
 az vm update --resource-group YourResourceGroupName --name YourVMName --set storageProfile.osDisk.diskSizeGB=1024
Once you see the new size in the returned response from Azure, we can start the VM again:
1
 az vm start --resource-group YourResourceGroupName --name YourVMName
Depending on the distribution you are using, you may have to perform additional steps. Ubuntu, however, mounts the new disk size without any additional action. Verifying the new disk size is pretty easy (after logging back in via SSH), as the System Information displayed after login should already reflect the change (like in the screen above).
Preparing the Bitcoin node
After completing all the steps above, we are finally able to move on with the preparations for the Bitcoin node.
Bitcoin service user
As we will run the node as a service, we need an unprivileged service account:
1
 sudo useradd -m -s /dev/null bitcoin
Great, we just created the account, including the creation of the home directory for the service user and default shell entry. If you want to see the system’s response, just leave out the /dev/null part out when running the command.
As we are going to restrict the access to the service to the bitcoin user (and its default group, which is also bitcoin), we need to add our admin user to the group. Run the following command to do so:
1
 sudo usermod -a -G bitcoin [admin-user]
In order to make these changes (especially the group add) persistent, we need to perform a restart before we move on. You can not only use the Azure portal or CLI, but also use this command to make the VM restart immediately:
1
 sudo shutdown -r now
This will log you out of the current SSH session. After waiting one minute or two, just log back in to continue the preparation of the full node.
Downloading and Verifying Bitcoin binaries
The next step involves downloading the bitcoin core package and its valid signature files (as we don’t trust, but verify). Run these two commands (you will need to hit enter a second time after the first download finished). I also created a temp directory for the download and other stuff.
1
2
3
4
5
 mkdir ~/temp
cd ~/temp
btc_version="0.18.1"
wget https://bitcoincore.org/bin/bitcoin-core-$btc_version/bitcoin-$btc_version-x86_64-linux-gnu.tar.gz
wget https://bitcoincore.org/bin/bitcoin-core-$btc_version/SHA256SUMS.asc
According to Bitcoin.org the latest releases are signed with Wladimir J. van der Laan’s releases key, which has the fingerprint we are going to verify the downloaded binaries. It is recommended to do this for all crypto-related binaries you’re downloading, no matter on which OS.
Let’s try to import the key of Mr. van der Laan:
1
 gpg --receive-key 0x01EA5486DE18A882D4C2684590C8019E36C2E964
You may get an error message telling you there was a server failure. In this case, run the following command to import the key:
1
 gpg --keyserver hkp://keyserver.ubuntu.com:80 --receive-key 0x01EA5486DE18A882D4C2684590C8019E36C2E964
If you still get errors, there might be some missing packages or other reasons for the server failure. I managed to come through with the second command more often than the first, but in the end, I had the key in my local key store.
Now let’s verify the downloaded files:
1
2
 gpg --verify SHA256SUMS.asc
sha256sum --ignore-missing -c SHA256SUMS.asc
 If the command tells you that the signature is good and indeed from Mr. van der Laan, everything is fine with the hash file. The second command verifies the archive we downloaded earlier and should result in ‘OK’. If not, you should immediately delete those files as they might contain malware.
Note: I have read quite a few comments on reddit and other sites that we can safely ignore those warnings …
Installing Bitcoin binaries
Now that we have our bitcoin service user and verified the bitcoin binaries, we are finally at the point to install them:
1
2
3
 tar zxf bitcoin-$btc_version-x86_64-linux-gnu.tar.gz
pushd bitcoin-$btc_version/bin; sudo cp bitcoind bitcoin-cli /usr/bin; popd;
bitcoind --version
After getting the install verification via the version string, it is a good practice to remove both the binaries and the hash file. If you need to reinstall, perform the steps above again to verify the authenticity of the files. Run these commands to remove those files:
1
2
 rm bitcoin-$btc_version-x86_64-linux-gnu.tar.gz
rm SHA256SUMS.asc
Create a service config file
Now that we have Bitcoin installed, we need to prepare a .conf file for our upcoming service:
1
2
3
 vi bitcoin.conf
or
nano bitcoin.conf
This will open a text editor on Linux. Enter the base config to get the RPC server of the Bitcoin daemon (needed for bitcoin-cli) activated and save the file to the temp disc (press ‘ESC’ + ‘:’ and write ‘wq‘ if you used vi:, ‘CTRL’+’x’ followed by ‘y’ on nano):
1
2
3
4
5
6
7
8
9
10
11
12
13
14
15
16
17
 testnet=0
regstest=0
mainnet=1
# Global Options
server=1 #activating rpc
rpcconnect=127.0.0.1 #default
rpcport=8332 #default
rpcallowip=127.0.0.1/32 #default
rpcbind=127.0.0.1  #default
disablewallet=1 #keeping wallet off (atm)
daemon=1
# Options only for mainnet
[main]
# Options only for testnet
[test]
# Options only for regtest
[regtest]
Now we just need to copy that file into the /etc/bitcoin folder. If this folder does not yet exist, create it with the following command:
1
 sudo mkdir -p /etc/bitcoin
Next, copy the bitcoin.conf file to it:
1
 sudo cp bitcoin.conf /etc/bitcoin
Assign ownership to the bitcoin service user and make it readable for all users:
1
2
 sudo chown bitcoin:bitcoin /etc/bitcoin/bitcoin.conf
sudo chmod 0664 /etc/bitcoin/bitcoin.conf
The last step is to create a directory for the daemon where we will find the PID (Process ID) file after starting the service:
1
2
3
 sudo mkdir -p /run/bitcoind/
sudo chmod 0755 /run/bitcoind/
sudo chown bitcoin:bitcoin /run/bitcoind/
Create the Bitcoin service
Now we are able to set up the core service of our node, the Bitcoin daemon service. In order to start, just copy and paste the one found at Bitcoin’s Github account into a new file on your VM. Once you have that file in your temp folder, copy it over to the system’s services folder:
1
 sudo cp bitcoind.service /lib/systemd/system
Now we need to enable the service to make it automatically starting up on reboot:
1
 sudo systemctl enable bitcoind
And finally, we need to start the service (or reboot the machine if you want to test that part):
1
 sudo systemctl start bitcoind
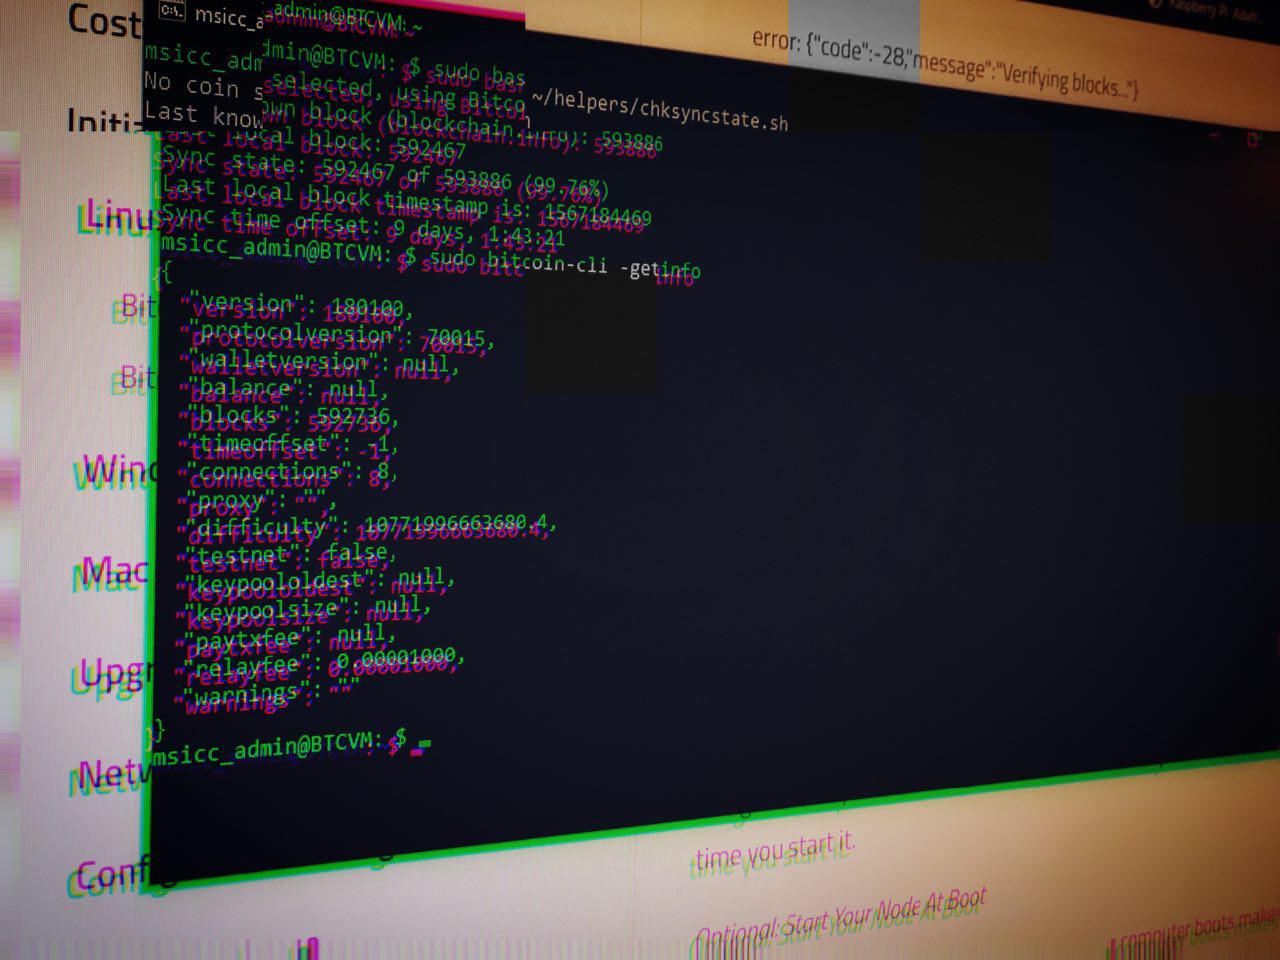
After some time, you should be able to use the bitcoin-cli to get some info of your local blockchain copy:
1
 sudo bitcoin-cli -rpccookiefile=/var/lib/bitcoind/.cookie -datadir=/var/lib/bitcoind -getinfo
Please note you need to use sudo because the owner of the service and the files is our bitcoin user we created earlier. If you don’t want to always pass the authentication cookie path, you can create a symbolic link to your current user’s .bitcoin folder:
1
 sudo ln -s /var/lib/bitcoind/.cookie ~/.bitcoin/.cookie
Now we are able to just call sudo bitcoin-cli -getinfo. Another way of checking if the service and the daemon are running is to read the log that gets generated:
1
 sudo tail /var/lib/bitcoind/debug.log -f
You should see the log scrolling through as it writes new entries. The most entries will look like this:
1
 2019-09-07T14:54:51Z UpdateTip: new best=000000000000004fa323c7ee57b4b22272c7ea757a6a5bdb53dbda73572f559d height=239240 version=0x00000002 log2_work=70.203272 tx=18819570 date='2013-06-02T08:32:35Z' progress=0.041989 cache=675.7MiB(5032783txo)
If you arrived at this point
Congratulations! You are running a Bitcoin full node (without wallet for the time being, though). It will take some time to download and verify the whole blockchain, but you are now effectively helping and securing the Bitcoin network.
This is just the first post about my journey with Bitcoin and my own node. Make sure to follow for future blog posts. As always, I hope this post will be helpful for some of you.