A deeper look into menu bar handling in MacCatalyst apps with .NET MAUI

My current side project TimeTraverseHub has entered the stage where I need to add some global menus that are available everywhere in the app. Being a .NET MAUI app, I tried the naive approach first and followed the documentation from Microsoft. I was able to quickly add items to the application’s menu bar, but discovered the edges pretty fast.
So I went out to learn more about how the menu works, and this post is a summary from all I learned and what is important (for my scenario). As always, my approach is MVVM driven, trying to decouple my solution as much as possible.
Before you start following along, take a moment to read Microsoft’s documentation of the menu bar handling to make sure we have the same understanding.
Removing default system menu items
When you create a new MacCatalyst app, it will come with a default menu bar:
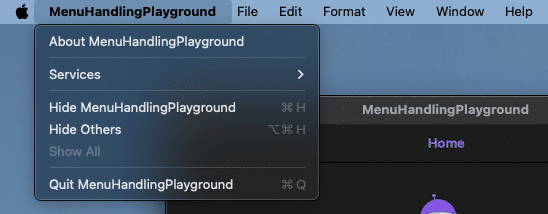 There are several options that aren’t needed in every app, like the Services entry in the application item or the Format menu. To avoid confusion amongst your users, you can easily disable items you do not need. In your
 AppDelegate class, use the BuildMenu(IUIMenuBuilder builder) override to disable the items not needed, like in this snippet:
1
2
3
4
5
6
7
8
9
10
11
12
13
14
15
 public override void BuildMenu(IUIMenuBuilder builder)
{
    base.BuildMenu(builder);

    builder.RemoveMenu(UIMenuIdentifier.Edit.GetConstant());
    builder.RemoveMenu(UIMenuIdentifier.Font.GetConstant());
    builder.RemoveMenu(UIMenuIdentifier.Format.GetConstant());
    builder.RemoveMenu(UIMenuIdentifier.Services.GetConstant());
    builder.RemoveMenu(UIMenuIdentifier.Hide.GetConstant());

    builder.RemoveMenu(UIMenuIdentifier.Close.GetConstant());
    builder.RemoveMenu(UIMenuIdentifier.Document.GetConstant());

    builder.System.SetNeedsRebuild();
}
As you can see, removing items from the menu bar is as easy as calling the RemoveMenu method on the IUIMenuBuilder instance. Some of the UIMenuIdentifier options are for the whole menu item (like Edit, File, Font, View), while others are for single entries within a menu (like the Close entry). Finally, there are also options that remove a group of menu entries (like the Hide or the Document entry).
Whenever you change the menu, you need to call the SetNeedsRebuild method to force the system to redraw the menu. The builder instance has a direct link to the UIMenuSystem.System property we can use.
Extend and override default system menu items
There is a good chance our application can use existing system menu items to server our app’s need. Apple has a good sample in its documentation for that, but we do not have direct access to that API from our MAUI application. I tried to modify the handler like stated in the Microsoft documentation, but forced me to handle all the menu items from there, effectively losing the advantages of the built-in handling.
After studying the source code on GitHub, I realized that the MAUI handlers are trying to merge into existing items whenever possible. This simply means we can add our options to existing menus, for example the File menu.
1
2
3
4
5
6
7
8
9
10
11
12
 <MenuBarItem Text="File">
    <MenuFlyoutItem Command="{Binding OpenFileCommand}" Text="Open file">
        <MenuFlyoutItem.KeyboardAccelerators>
            <KeyboardAccelerator Key="O" Modifiers="Cmd" />
        </MenuFlyoutItem.KeyboardAccelerators>
    </MenuFlyoutItem>
    <MenuFlyoutItem Command="{Binding CloseFileCommand}" Text="Close file">
        <MenuFlyoutItem.KeyboardAccelerators>
            <KeyboardAccelerator Key="C" Modifiers="Alt,Cmd" />
        </MenuFlyoutItem.KeyboardAccelerators>
    </MenuFlyoutItem>
</MenuBarItem>
This will add the items on top of the File menu bar item:
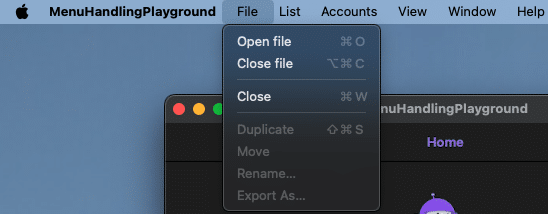 Sadly, there is no way to directly override existing items. We also cannot control the position where the items get added. New entries will always be added on top of the system menu.
A good example where this isn’t ideal is the Settings menu entry. Apple has reserved the second option in the application menu for Settings/Preferences. If you used the Settings.bundle approach, the entry for Preferences would get added right there. This has the disadvantage of not being able to use a custom UI for our settings page, though. To get rid of that, we want to add our own item via the MAUI API:
1
2
3
4
5
6
7
 <MenuBarItem Text="Application">
    <MenuFlyoutItem Command="{Binding SettingsCommand}" Text="Settings">
        <MenuFlyoutItem.KeyboardAccelerators>
            <KeyboardAccelerator Key="," Modifiers="Cmd" />
        </MenuFlyoutItem.KeyboardAccelerators>
    </MenuFlyoutItem>
</MenuBarItem>
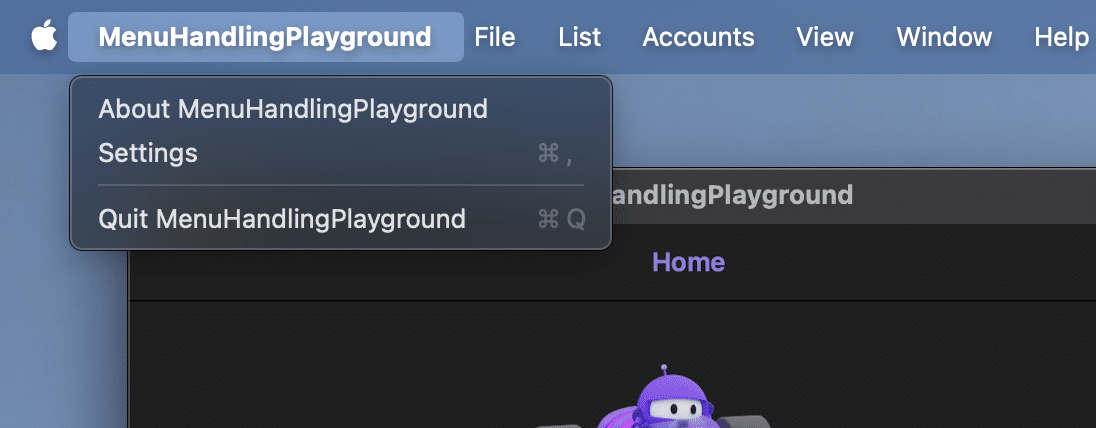
Using this approach will add the Settings menu on top of the Application menu, however. To replicate the default order, we need to remove the About item amongst the other options in our AppDelegate and add our own About item:
1
2
3
4
5
6
7
8
9
 <MenuBarItem Text="Application">
    <MenuFlyoutItem Command="{Binding AboutCommand}" Text="About MenuHandlingPlayground" />
    <!-- <MenuFlyoutSeparator /> -->
    <MenuFlyoutItem Command="{Binding SettingsCommand}" Text="Settings">
        <MenuFlyoutItem.KeyboardAccelerators>
            <KeyboardAccelerator Key="," Modifiers="Cmd" />
        </MenuFlyoutItem.KeyboardAccelerators>
    </MenuFlyoutItem>
</MenuBarItem>
With the above code, we will get the About item back into place, and the Settings item at its desired and expected position:
 Using this approach, we can add functionality that is hosted in all system menu entries, like the Undo/Redo items in the Edit menu as well.
Now that we understand how to manipulate the menu bar, let’s take a look at how we can change the menu while our app is running.
Dynamically add and remove items to existing menu items
There is a high chance we need to modify the application menu bar depending on the application’s state. If you are using the MVVM pattern, one of your ViewModels will trigger all the actions to change the menu bar items and their child items. To be able to perform these actions, I created the IMenuService interface with its implementation.
For the first part, we will focus on these methods:
1
2
3
4
5
6
7
8
9
10
11
12
 public interface IMenuService
{
    IMenuFlyoutItem? GetMenuFlyoutItem(string name);

    void AddMenuFlyoutItem(string menu, string name, Action execute, int position = -1, KeyboardAcceleratorModifiers modifiers = KeyboardAcceleratorModifiers.None, string? shortCutKey = null);

    void RemoveMenuFlyoutItem(string menu, string name);

    bool MenuFlyoutItemExists(string name);

    Page? MenuHostingPage { get;  set; }
}
With the GetMenuFlyoutItem method, we will query the Shell.MenuBarItems property for the item with the specified text, which should hold a list of all manually created MenuBarItems:
1
2
3
4
5
6
7
8
9
10
11
12
13
14
15
16
17
 public IMenuFlyoutItem? GetMenuFlyoutItem(string name)
{
   if (this.MenuHostingPage == null)
       throw new InvalidOperationException($"{nameof(this.MenuHostingPage)} must not be null");

    IMenuFlyoutItem? result = null;

    this.MenuHostingPage.MenuBarItems.ToList().ForEach(menuBarItem =>
    {
        var foundItem = menuBarItem.SingleOrDefault(menuElement => menuElement is MenuFlyoutItem menuItem && menuItem.Text == name);

        if (foundItem != null)
            result = foundItem as MenuFlyoutItem;
    });

    return result;
}
The AddMenuFlyoutItem method adds a new MenuFlyoutItem to the menu specified. You can also configure a keyboard shortcut if needed. The added item will have the execute Action being executed once the Command of the MenuFlyoutItem gets invoked. On top, we will be able to specify an index where to put the item in the list if needed. This will work only with our own MenuBarItems and throw an Exception on system MenuBarItems:
1
2
3
4
5
6
7
8
9
10
11
12
13
14
15
16
17
18
19
20
21
22
23
24
25
26
27
28
29
30
31
32
33
34
35
36
37
38
39
 public void AddMenuFlyoutItem(string menu, string name, Action execute, int position = -1, KeyboardAcceleratorModifiers modifiers = KeyboardAcceleratorModifiers.None, string? shortCutKey = null)
{
   if (this.MenuHostingPage == null)
       throw new InvalidOperationException($"{nameof(this.MenuHostingPage)} must not be null");

    var menuBarItem = this.MenuHostingPage.MenuBarItems.ToList().SingleOrDefault(menuBarItem => menuBarItem.Text == menu);

    if (menuBarItem == null)
        throw new InvalidOperationException($"no MenuBarItem with text {menu} found in current application menu");

    if (menuBarItem.Any(element => element.Text == name))
        throw new InvalidOperationException($"MenuBarItem with text {menu} contains already an item with text '{name}'");

    var itemToAdd = new MenuFlyoutItem()
    {
        Text = name,
        Command = new RelayCommand(execute)
    };

    if (modifiers != KeyboardAcceleratorModifiers.None && !string.IsNullOrWhiteSpace(shortCutKey))
    {
        itemToAdd.KeyboardAccelerators.Add(new KeyboardAccelerator()
        {
            Modifiers = modifiers,
            Key = shortCutKey
        });
    }

    if (position != -1)
    {
        menuBarItem.Insert(position, itemToAdd);
    }
    else
    {
        menuBarItem.Add(itemToAdd);
    }

    ForceMenuRebuild();
}
Finally, the RemoveMenuFlyoutItem item will remove the specified MenuFlyoutItem from the MenuBarItem:
1
2
3
4
5
6
7
8
9
10
11
12
13
14
15
16
17
18
19
 public void RemoveMenuFlyoutItem(string menu, string name)
{
   if (this.MenuHostingPage == null)
       throw new InvalidOperationException($"{nameof(this.MenuHostingPage)} must not be null");

    var menuBarItem = this.MenuHostingPage.MenuBarItems.ToList().SingleOrDefault(menuBarItem => menuBarItem.Text == menu);

    if (menuBarItem == null)
        throw new InvalidOperationException($"no MenuBarItem with text {menu} found in current application menu");

    var itemToRemove = GetMenuFlyoutItem(name);

    if (itemToRemove == null)
        throw new InvalidOperationException($"no MenuFlyouItem with text {name} found in MenuBarItem with text {menu}");

    menuBarItem.Remove(itemToRemove);

    ForceMenuRebuild();
}
You may probably wonder what the ForceMenuRebuild method does. This is needed to rebuild the menu (as mentioned already before). Here is the overly complicated implementation:
1
2
3
4
5
6
 private void ForceMenuRebuild()
{
#if MACCATALYST
    UIMenuSystem.MainSystem.SetNeedsRebuild();
#endif
}
Let’s complete with the MenuFlyoutItemExists method, which helps us to easily check if a MenuFlyouItem is already in our menu:
1
2
 public bool MenuFlyoutItemExists(string name) =>
    GetMenuFlyoutItem(name) != null;
If you have read the documentation, you know we can also create sub menus. Let’s take a look into handling their MenuFlyoutItems as well in the next part.
Dynamically add and remove items to sub menus
The IMenuService interface provides the following methods to interact with sub menu items:
1
2
3
4
5
6
7
8
9
 public interface IMenuService
{
    IMenuFlyoutSubItem? GetSubMenu(string name);
    IMenuFlyoutItem? GetSubMenuFlyoutItem(string parentSubMenu, string name);
    void AddMenuFlyoutItemToSubItem(string parentSubMenu, string name, Action execute, int position = -1, KeyboardAcceleratorModifiers modifiers = KeyboardAcceleratorModifiers.None, string? shortCutKey = null);
    void RemoveMenuFlyoutItemFromSubMenu(string parentSubMenu, string name);
    bool SubMenuExists(string name);
    bool MenuFlyoutItemInSubMenuExists(string parentSubMenu, string name);
}
With the GetSubMenu method, we query all existing MenuBarItem entries for a MenuFlyoutSubItem with the specified name:
1
2
3
4
5
6
7
8
9
10
11
12
13
14
15
16
17
 public IMenuFlyoutSubItem? GetSubMenu(string name)
{
   if (this.MenuHostingPage == null)
       throw new InvalidOperationException($"{nameof(this.MenuHostingPage)} must not be null");

    IMenuFlyoutSubItem? result = null;

    this.MenuHostingPage.MenuBarItems.ToList().ForEach(menuBarItem =>
    {
        var foundItem = menuBarItem.SingleOrDefault(menuElement => menuElement is MenuFlyoutSubItem subMenu && subMenu.Text == name);

        if (foundItem != null)
            result = foundItem as MenuFlyoutSubItem;
    });

    return result;
}
We will use the GetSubMenuFlyoutItem method to query all existing MenuBarItem entries for a MenuFlyoutSubMenuItem, and search the child entries in it for the MenuFlyoutItem with the specified name:
1
2
3
4
5
6
7
8
 public IMenuFlyoutItem? GetSubMenuFlyoutItem(string parentSubMenu, string name)
{
    var subMenu = GetSubMenu(parentSubMenu);

    var result = subMenu?.SingleOrDefault(element => element.Text == name);

    return result as MenuFlyoutItem;
}
The AddMenuFlyoutItemToSubMenu method tries to add a new MenuFlyoutItem to the specified MenuFlyoutSubItem. It also hands over the execute Action to the Command of the new MenuFlyoutItem and allows, once again, specifiing a keyboard shortcut and an optional index to insert the item:
1
2
3
4
5
6
7
8
9
10
11
12
13
14
15
16
17
18
19
20
21
22
23
24
25
26
27
28
29
30
31
32
33
34
35
36
 public void AddMenuFlyoutItemToSubMenu(string parentSubMenu, string name, Action execute, int position = -1, KeyboardAcceleratorModifiers modifiers = KeyboardAcceleratorModifiers.None, string? shortCutKey = null)
{
    var subMenu = GetSubMenu(parentSubMenu);

    if (subMenu == null)
        throw new InvalidOperationException($"no MenuFlyoutSubItem with text {parentSubMenu} found in current application menu");

    if (MenuFlyoutItemInSubMenuExists(parentSubMenu, name))
        throw new InvalidOperationException($"MenuFlyoutSubItem with text {parentSubMenu} contains already an item with text '{name}'");

    var itemToAdd = new MenuFlyoutItem()
    {
        Text = name,
        Command = new RelayCommand(execute)
    };

    if (modifiers != KeyboardAcceleratorModifiers.None && !string.IsNullOrWhiteSpace(shortCutKey))
    {
        itemToAdd.KeyboardAccelerators.Add(new KeyboardAccelerator()
        {
            Modifiers = modifiers,
            Key = shortCutKey
        });
    }

    if (position != -1)
    {
        subMenu.Insert(position, itemToAdd);
    }
    else
    {
        subMenu.Add(itemToAdd);
    }

    ForceMenuRebuild();
}
Let’s take a look on how to remove a MenuFlyoutItem from a MenuFlyoutSubItem with the RemoveMenuFlyouItemFromSubMenu method:
1
2
3
4
5
6
7
8
9
10
11
12
13
14
15
16
 public void RemoveMenuFlyoutItemFromSubMenu(string parentSubMenu, string name)
{
    var itemToRemove = GetSubMenuFlyoutItem(parentSubMenu, name);

    if (itemToRemove == null)
        throw new InvalidOperationException($"no MenuFlyoutItem with text {name} and parent MenuFlyoutSubItem with text {parentSubMenu} found in current application menu");

    var subMenu = GetSubMenu(parentSubMenu);

    if (subMenu == null)
        throw new InvalidOperationException($"no MenuFlyoutSubItem with text {parentSubMenu} found in current application menu");

    subMenu.Remove(itemToRemove);

    ForceMenuRebuild();
}
Last but not lest, we can easily check if a MenuFlyoutSubItem exists or a MenuFlyoutItem inside of a MenuFlyoutSubItem:
1
2
3
4
5
 public bool SubMenuExists(string name) =>
    GetSubMenu(name) != null;

public bool MenuFlyoutItemInSubMenuExists(string parentSubMenu, string name) =>
    GetSubMenuFlyoutItem(parentSubMenu, name) != null;
As I do not need to add sub menus in my current app, I did not implement that functionality. Using the code above as a sample, you should be able to add it in no time if you need it in your app. I’ll update this post and the GitHub repo once this changes for me.
So let’s have a look how we can bring all these boring implementations to work in our app, finally.
Usage
Injecting the service
The usage is straight forward. First, register the Service in your MauiProgram.cs:
1
2
3
4
5
 private static void CreateService(IServiceCollection services)
{
    [...]
    services.AddSingleton<IMenuService, MenuService>();
}
This allows us to inject it directly into the corresponding ViewModel for a Page or the Shell:
1
2
3
4
5
6
 private readonly IMenuService _menuService;

public AppShellViewModel(IMenuService menuService)
{
    _menuService = menuService;
}
Last but not least, we need to set the MenuHostingPage on the IMenuService registration. For most applications, this can easily be done in App.xaml.cs or any other place after you have set your root page:
1
2
3
4
5
6
7
8
 public App(IServiceProvider services) : base(services)
{
    InitializeComponent();

    this.MainPage = new AppShell(services.GetService<AppShellViewModel>()!);

    services.GetService<IMenuService>()!.MenuHostingPage = this.MainPage;
}
Add or insert a MenuFlyoutItem
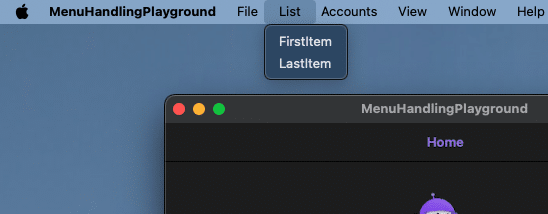
Let’s try to add and insert an item into the demo application’s List menu:
 The demo application uses a command that handles both cases with this method:
1
2
3
4
5
6
7
8
9
10
11
12
13
14
15
16
17
18
19
20
21
22
23
24
25
26
27
28
29
 private void HandleListMenuBarItem(int number)
{
    var menubarName = "List";
    var insertedName = "Inserted Item";
    var addedName = "Added Item";

    if (number == 0)
    {
        if (_menuService.MenuFlyoutItemExists(insertedName))
        {
            _menuService.RemoveMenuFlyoutItem(menubarName, insertedName);
        }
        else
        {
            _menuService.AddMenuFlyoutItem(menubarName, insertedName, ()=> ShowSelectedMessage(insertedName), 1);
        }
    }
    else if (number == 2)
    {
        if (_menuService.MenuFlyoutItemExists(addedName))
        {
            _menuService.RemoveMenuFlyoutItem(menubarName, addedName);
        }
        else
        {
            _menuService.AddMenuFlyoutItem(menubarName, addedName, ()=> ShowSelectedMessage(addedName));
        }
    }
}
Clicking the FirstItem will insert an item between those two, while hitting the LastItem will add the item at the end of the MenuBarItem‘s children:
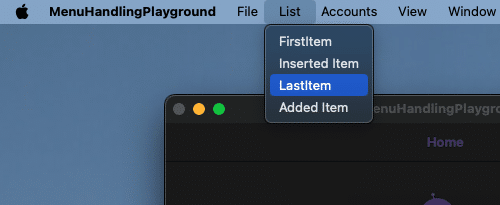 Hitting both options again will remove the items once again.
Add and remove items from a MenuFlyoutSubItem
Let’s take a look at the sample application’s Accounts menu:
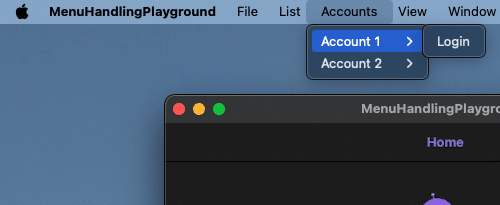 Clicking on the Login button, the demo app will perform a fake login with the Login option being removed and an item with the account’s name being added. At the end, there will be also a Logout button in the submenu. Here is the code for the faked login:
1
2
3
4
5
6
7
8
9
10
11
12
13
14
15
16
 private void FakeAccountLogin(int id)
{
    var subMenuParent = $"Account {id}";
    var sampleAccountName = $"SampleAccount {id}";

    if (_menuService.MenuFlyoutItemInSubMenuExists(subMenuParent, sampleAccountName))
        return;

    _menuService.AddMenuFlyoutItemToSubMenu(subMenuParent, sampleAccountName, () => ShowSelectedMessage($"{nameof(FakeAccountLogin)} for id {id}"));

    if (_menuService.MenuFlyoutItemInSubMenuExists(subMenuParent, "Login"))
        _menuService.RemoveMenuFlyoutItemFromSubMenu(subMenuParent, "Login");

    if (!_menuService.MenuFlyoutItemInSubMenuExists(subMenuParent, "Logout"))
        _menuService.AddMenuFlyoutItemToSubMenu(subMenuParent, "Logout", ()=> Logout(id), modifiers: KeyboardAcceleratorModifiers.Cmd | KeyboardAcceleratorModifiers.Shift, shortCutKey: id.ToString());
}
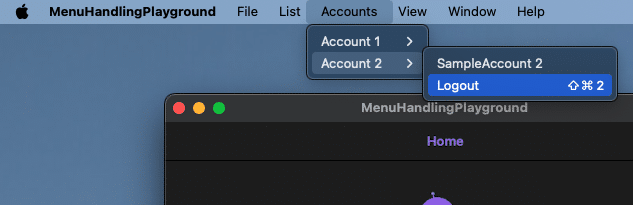
This is the result of hitting the Login button on either account:
Some more gotcha’s
- You may have noticed the missing separator line after the about menu. As of writing this blog post,
MenuFlyoutSeparatoris not working on MacCatalyst. I already reported the error on GitHub - Don’t get tricked into trying to use your application’s name to access the application menu. It will add a new menu bar item into the bar instead of merging with the existing application menu. Use the word ’Application‘ instead.
- If your application has multiple windows, you will need to create the menu on each window (for example in their root page). You will need to pass in the root page of each window to the
IMenuServiceinstance handling the menu bar for the window. - You can have page-specific menus as well. To achieve this, you’ll need to pass the corresponding page instance to the
IMenuServiceinstance.
Conclusion
Handling the application menu is a common task for desktop applications. Microsoft’s documentation focuses only on static creation of those menus. Often, we need to create dynamic menu entries during the lifetime of our apps, though. In this post, I showed you an easy solution to achieve this with your MVVM applications. As always, I hope this post will be helfpful for some of you.
You can find the demo applicaiton here on GitHub.
Until the next post, happy coding!
Helpful links
- https://developer.apple.com/documentation/uikit/uicommand/adding_menus_and_shortcuts_to_the_menu_bar_and_user_interface?language=objc
- https://developer.apple.com/documentation/uikit/mac_catalyst/displaying_a_preferences_window?language=objc
- https://zachsim.one/blog/2019/8/4/customising-the-menu-bar-of-a-catalyst-app-using-uimenubuilder
- https://learn.microsoft.com/en-us/dotnet/maui/user-interface/menu-bar?view=net-maui-8.0