How to capture a photo in your Windows Phone 8.1 Runtime app – Part III: capturing and saving the photo
This is the third and last post of this series. In the first two posts I showed you how to start the preview of MediaCapture and some modifications we can apply to it. In this post, we are finally capturing and saving the photo – including the modifications we made before.
The easiest way – capture as is:
The easiest way to capture the photo is to use MediaCapture’s CapturePhotoToStorageFileAsync() method. This method shows you how to do it:
1
2
3
4
5
6
7
8
9
10
11
12
13
           //declare image format
            ImageEncodingProperties format = ImageEncodingProperties.CreateJpeg();

            //generate file in local folder:
            StorageFile capturefile = await ApplicationData.Current.LocalFolder.CreateFileAsync("photo_" + DateTime.Now.Ticks.ToString(), CreationCollisionOption.ReplaceExisting);

            ////take & save photo
            await captureManager.CapturePhotoToStorageFileAsync(format, capturefile);

            //show captured photo
            BitmapImage img = new BitmapImage(new Uri(capturefile.Path));
            takenImage.Source = img;
            takenImage.Visibility = Visibility.Visible;
This way however does not respect any modifications we made to the preview. The only thing that gets respected is the camera device we are using.
Respecting rotation in the captured photo:
In our ongoing sample, we are using a 90 degree rotation to display the preview element in portrait mode. Naturally, we want to port over this orientation in our captured image.
There are two ways to achieve this. We could capture the photo to a WriteableBitmap and manipulate it, or we could manipulate the image stream directly with the BitmapDecoder and BitmapEncoder classes. We will do the latter one.
First, we need to open an InMemoryRandomAccessStream for our the captured photo. We are capturing the photo to the stream with MediaCapture’s CapturePhotoToStreamAsync() method, specifing the stream name and the image format.
The next step is to decode the stream with our BitmapDecoder. If we are performing only rotation, we can directly re-encode the InMemoryRandomAccessStream we are using. Rotating the captured photo is very simple with just setting the BitmapTransform.Rotation property to be rotated by 90 degrees, pretty much as easy as rotating the preview.
The last steps are generating a file in the storage, followed by copying the transcoded image stream into the file stream. Here is the complete code that does all this:
1
2
3
4
5
6
7
8
9
10
11
12
13
14
15
16
17
18
19
20
21
22
23
24
25
26
27
28
29
30
31
32
33
34
35
36
37
38
39
40
          //declare string for filename
            string captureFileName = string.Empty;
            //declare image format
            ImageEncodingProperties format = ImageEncodingProperties.CreateJpeg();

            //rotate and save the image
            using (var imageStream = new InMemoryRandomAccessStream())
            {
                //generate stream from MediaCapture
                await captureManager.CapturePhotoToStreamAsync(format, imageStream);

                //create decoder and encoder
                BitmapDecoder dec = await BitmapDecoder.CreateAsync(imageStream);
                BitmapEncoder enc = await BitmapEncoder.CreateForTranscodingAsync(imageStream, dec);

                //roate the image
                enc.BitmapTransform.Rotation = BitmapRotation.Clockwise90Degrees;

                //write changes to the image stream
                await enc.FlushAsync();

                //save the image
                StorageFolder folder = KnownFolders.SavedPictures;
                StorageFile capturefile = await folder.CreateFileAsync("photo_" + DateTime.Now.Ticks.ToString() + ".jpg", CreationCollisionOption.ReplaceExisting);
                captureFileName = capturefile.Name;

                //store stream in file
                using (var fileStream = await capturefile.OpenStreamForWriteAsync())
                {
                    try
                    {
                        //because of using statement stream will be closed automatically after copying finished
                        await RandomAccessStream.CopyAsync(imageStream, fileStream.AsOutputStream());
                    }
                    catch
                    {

                    }
                }
            }
Of course, we need to stop the preview after we captured the photo. It also makes all sense to load the saved image and display it to the user. This is the code to stop the preview:
1
2
3
4
5
6
7
8
9
10
11
12
13
14
15
16
17
18
19
20
        private async void CleanCapture()
        {

            if (captureManager != null)
            {
                if (isPreviewing == true)
                {
                    await captureManager.StopPreviewAsync();
                    isPreviewing = false;
                }
                captureManager.Dispose();

                previewElement.Source = null;
                previewElement.Visibility = Visibility.Collapsed;
                takenImage.Source = null;
                takenImage.Visibility = Visibility.Collapsed;
                captureButton.Content = "capture";
            }

        }
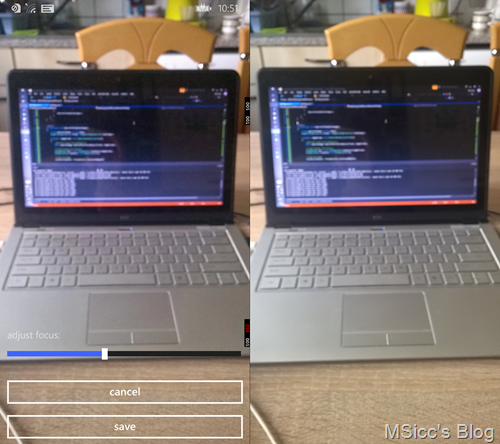
The result of above mentioned code (screenshot of preview left, captured photo right):
Cropping the captured photo
Not all Windows Phone devices have an aspect ratio of 16:9. In fact, most devices in the market have an aspect ratio of 15:9, due to the fact that they are WVGA or WXGA devices (I talked a bit about this already in my second post). If we are just capturing the photo with the method above, we will have the same black bands in our image as we have in our preview. To get around this and capture a photo that has a true 15:9 resolution (makes sense for photos that get reused in apps, but less for real life photos), additional code is needed.
As with getting the right camera solution, I generated an Enumeration that holds all possible values as well as a helper method to detect which aspect ratio the currently used device has:
1
2
3
4
5
6
7
8
9
10
11
12
13
14
15
16
17
18
19
20
21
22
23
24
        public enum DisplayAspectRatio
        {
            Unknown = -1,

            FifteenByNine = 0,

            SixteenByNine = 1
        }

        private DisplayAspectRatio GetDisplayAspectRatio()
        {
            DisplayAspectRatio result = DisplayAspectRatio.Unknown;

            //WP8.1 uses logical pixel dimensions, we need to convert this to raw pixel dimensions
            double logicalPixelWidth = Windows.UI.Xaml.Window.Current.Bounds.Width;
            double logicalPixelHeight = Windows.UI.Xaml.Window.Current.Bounds.Height;

            double rawPerViewPixels = DisplayInformation.GetForCurrentView().RawPixelsPerViewPixel;
            double rawPixelHeight = logicalPixelHeight * rawPerViewPixels;
            double rawPixelWidth = logicalPixelWidth * rawPerViewPixels;

            //calculate and return screen format
            double relation = Math.Max(rawPixelWidth, rawPixelHeight) / Math.Min(rawPixelWidth, rawPixelHeight);
            if (Math.Abs(relation - (15.0 / 9.0))
In Windows Phone 8.1, all Elements use logical pixel size. To get the values that most of us are used to, we need to calculate the raw pixels from the logical pixels. After that, we use the same math operations I used already for detecting the ratio of the camera resolution (see post 2). I tried to calculate the values with the logical pixels as well, but this ended up in some strange rounding behavior and not the results I wanted. That’s why I use the raw pixel sizes.
Before we continue with capturing the photo, we are going to add a border that is displayed and shows the area which is captured to the user in XAML:
1
            <border borderbrush="Red" borderthickness="2" horizontalalignment="Left" verticalalignment="Top" visibility="Collapsed" x:name="finalPhotoAreaBorder"></border>
When we are cropping our photo, we need to treaten the BitmapEncoder and the BitmapDecoder separately. To crop an image, we need to set the Bounds and the new Width and Height of the photo via the BitmapTransform.Bounds property. We also need to read the PixelData via the GetPixelDataAsync() method, apply the changed Bounds to it and pass them to BitmapEncoder via the SetPixelData() method.
At the end, we are flushing the changed stream data directly into the file stream of our StorageFile. Here is how:
1
2
3
4
5
6
7
8
9
10
11
12
13
14
15
16
17
18
19
20
21
22
23
24
25
26
27
28
29
30
31
32
33
34
35
36
37
38
39
40
41
42
43
44
45
46
47
48
49
50
51
52
53
54
55
            //declare string for filename
            string captureFileName = string.Empty;
            //declare image format
            ImageEncodingProperties format = ImageEncodingProperties.CreateJpeg();

            using (var imageStream = new InMemoryRandomAccessStream())
            {
                //generate stream from MediaCapture
                await captureManager.CapturePhotoToStreamAsync(format, imageStream);

                //create decoder and transform
                BitmapDecoder dec = await BitmapDecoder.CreateAsync(imageStream);
                BitmapTransform transform = new BitmapTransform();

                //roate the image
                transform.Rotation = BitmapRotation.Clockwise90Degrees;
                transform.Bounds = GetFifteenByNineBounds();

                //get the conversion data that we need to save the cropped and rotated image
                BitmapPixelFormat pixelFormat = dec.BitmapPixelFormat;
                BitmapAlphaMode alpha = dec.BitmapAlphaMode;

                //read the PixelData
                PixelDataProvider pixelProvider = await dec.GetPixelDataAsync(
                    pixelFormat,
                    alpha,
                    transform,
                    ExifOrientationMode.RespectExifOrientation,
                    ColorManagementMode.ColorManageToSRgb
                    );
                byte[] pixels = pixelProvider.DetachPixelData();

                //generate the file
                StorageFolder folder = KnownFolders.SavedPictures;
                StorageFile capturefile = await folder.CreateFileAsync("photo_" + DateTime.Now.Ticks.ToString() + ".jpg", CreationCollisionOption.ReplaceExisting);
                captureFileName = capturefile.Name;

                //writing directly into the file stream
                using (IRandomAccessStream convertedImageStream = await capturefile.OpenAsync(FileAccessMode.ReadWrite))
                {
                    //write changes to the BitmapEncoder
                    BitmapEncoder enc = await BitmapEncoder.CreateAsync(BitmapEncoder.JpegEncoderId, convertedImageStream);
                    enc.SetPixelData(
                        pixelFormat,
                        alpha,
                        transform.Bounds.Width,
                        transform.Bounds.Height,
                        dec.DpiX,
                        dec.DpiY,
                        pixels
                        );

                    await enc.FlushAsync();
                }
            }
You may have notice the GetFifteenByNineBounds() method in the above code. As we need to calculate some values for cropping the image, I decided to separate them. They are not only providing values for the image to be cropped, but also size values for our earlier added Border that is used in my sample (download link at the end of the project) to show the size that the photo will have after our cropping (which is an automatic process in our case,). Here is the code:
1
2
3
4
5
6
7
8
9
10
11
12
13
14
15
16
17
18
19
20
21
22
23
24
25
26
27
28
29
30
31
32
33
34
35
36
37
38
39
40
41
42
        private BitmapBounds GetFifteenByNineBounds()
        {
            BitmapBounds bounds = new BitmapBounds();

            //image size is raw pixels, so we need also here raw pixels
            double logicalPixelWidth = Windows.UI.Xaml.Window.Current.Bounds.Width;
            double logicalPixelHeight = Windows.UI.Xaml.Window.Current.Bounds.Height;

            double rawPerViewPixels = DisplayInformation.GetForCurrentView().RawPixelsPerViewPixel;
            double rawPixelHeight = logicalPixelHeight * rawPerViewPixels;
            double rawPixelWidth = logicalPixelWidth * rawPerViewPixels;

            //calculate scale factor of UniformToFill Height (remember, we rotated the preview)
            double scaleFactorVisualHeight = maxResolution().Width / rawPixelHeight;

            //calculate the visual Width
            //(because UniFormToFill scaled the previewElement Width down to match the previewElement Height)
            double visualWidth = maxResolution().Height / scaleFactorVisualHeight;

            //calculate cropping area for 15:9
            uint scaledBoundsWidth = maxResolution().Height;
            uint scaledBoundsHeight = (scaledBoundsWidth / 9) * 15;

            //we are starting at the top of the image
            bounds.Y = 0;
            //cropping the image width
            bounds.X = 0;
            bounds.Height = scaledBoundsHeight;
            bounds.Width = scaledBoundsWidth;

            //set finalPhotoAreaBorder values that shows the user the area that is captured
            finalPhotoAreaBorder.Width = (scaledBoundsWidth / scaleFactorVisualHeight) / rawPerViewPixels;
            finalPhotoAreaBorder.Height = (scaledBoundsHeight / scaleFactorVisualHeight) / rawPerViewPixels;
            finalPhotoAreaBorder.Margin = new Thickness(
                                            Math.Floor(((rawPixelWidth - visualWidth) / 2) / rawPerViewPixels),
                                            0,
                                            Math.Floor(((rawPixelWidth - visualWidth) / 2) / rawPerViewPixels),
                                            0);
            finalPhotoAreaBorder.Visibility = Visibility.Visible;

            return bounds;
        }
Again, we need to apply raw pixels to achieve the best results here (I just pasted those lines in for this sample). To calculate the correct values for our Border, we need the scale factor between the screen and the preview resolution we used (which is the scaleFactorVisualHeight double). Before we’re calculating the border values, we are setting the Width to resolution’s Height (we rotated, remember?) and calculate the matching 15:9 Height.
The Border values are based on the Width and Height of the cropped image, but scaled down by scaleFactorVisualHeight’s value and converted in raw pixel. The Margin positions the border accordingly on top of the preview element.
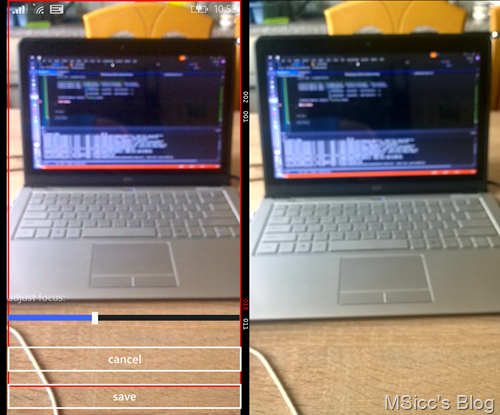
his is the result of above mentioned code (screenshot of preview left, captured photo right):
That’s all you need to know to get started with basic photo capturing from within your Windows Phone 8.1 Runtime app. Of course, there are also other modifications that you can apply, and I mentioned already most of the classes that lead you to the matching methods and properties (click on the links to get to the documentation)
By the way, most of the code can be adapted in a Windows 8.1 app as well (with some differences, of course).
Until the next time, happy coding!

