How to capture a photo in your Windows Phone 8.1 Runtime app-Part II: some common modifications
Like promised in my first post about photo capturing, I will provide some common modification scenarios when using the MediaCapture API. This is what this post is about.
Choosing a camera
If you read my first post, you probably remember that the MediaCapture API automatically selected the front camera of my Lumia 1020. Like often, we have to write some additional code to switch between the cameras.
The cameras are listed in the Panels in the Windows.Devices.Enumeration Namespace. This namespace contains all “devices” that are connected to the phone and has different properties to detect the correct panel. We are going to use the DeviceClass to detect all video capture devices (which are normally also the photo capture devices on Windows Phone, but can be different on a PC/Tablet). As we want to switch between Front and Back, we are also detecting the EnclosureLocation. Here is how I implemented it:
1
2
3
4
5
6
7
    private static async Task<DeviceInformation> GetCameraID(Windows.Devices.Enumeration.Panel camera)
{
    DeviceInformation deviceID = (await DeviceInformation.FindAllAsync(DeviceClass.VideoCapture))
        .FirstOrDefault(x => x.EnclosureLocation != null && x.EnclosureLocation.Panel == camera);

    return deviceID;
}
To make this Task actually useful, we are also updating the InitializePreview() method from the first part:
1
2
3
4
5
6
7
8
9
10
11
12
13
14
15
16
private async void InitializePreview()
{
    captureManager = new MediaCapture();

    var cameraID = await GetCameraID(Windows.Devices.Enumeration.Panel.Back);

    await captureManager.InitializeAsync(new MediaCaptureInitializationSettings
    {
        StreamingCaptureMode = StreamingCaptureMode.Video,
        PhotoCaptureSource = PhotoCaptureSource.Photo,
        AudioDeviceId = string.Empty,
        VideoDeviceId = cameraID.Id,
    });

    StartPreview();
}
In this case, we selected the back camera. To make the MediaCapture API actually use this device, we need to generate a new instance of MediaCaptureInitializationSettings, where we select the cameras Id as VideDeviceId. If you now start capturing, this is an exemplary result:
Rotating the preview
However, this not quite satisfying, because the preview automatically uses the landscape orientation. Luckily, this can be changed with just one single line of code (that needs to be added before actually starting the preview):
1
 captureManager.SetPreviewRotation(VideoRotation.Clockwise90Degrees);
Now the result looks like this:
Note: the black bands on both sides may happen due to the fact that most devices have a 15:9 ratio (WXGA, WVGA). On Devices like the Lumia 830 or 930, which have a 16:9 ratio, the preview will use the full screen in portrait mode. I tried a lot of things to get rid of those bands already, sadly without success. Once I found a proper solution, I will write another blog post and link it here on how to do it (any tips are welcome).
Limiting resolution
Sometimes, we need to limit resolutions (for example resolution limits on other parts in our app). This is possible by detecting the supported solutions and matching them to the screen ratio. As we are using the whole screen for previewing, of course we want to get our captured photo to use the same space, too.
My way to do this is to calculate the screen ratio, and return an enumeration value. This is the easiest way, and can be easily used in the further code to limit the resolution. The enumeration looks like this:
1
2
3
4
5
6
7
8
 public enum CameraResolutionFormat
{
    Unknown = -1,

    FourByThree = 0,

    SixteenByNine = 1
}
And this is my helper to match the screen format (which is always wide screen on Windows Phone):
1
2
3
4
5
6
7
8
9
10
11
12
13
14
15
16
private CameraResolutionFormat MatchScreenFormat(Size resolution)
{
    CameraResolutionFormat result = CameraResolutionFormat.Unknown;

    double relation = Math.Max(resolution.Width, resolution.Height) / Math.Min(resolution.Width, resolution.Height);
    if (Math.Abs(relation - (4.0 / 3.0)) < 0.01)
    {
        result = CameraResolutionFormat.FourByThree;
    }
    else if (Math.Abs(relation - (16.0 / 9.0)) < 0.01)
    {
        result = CameraResolutionFormat.SixteenByNine;
    }

    return result;
}
We could easily extend the calculation to 15:9, too. However, as the most camera resolutions are 4:3 or 16:9, this makes no sense in our use case (as 15:9 is still a widescreen format). The next thing we need to add is another helper to get the highest possible resolution for our photo and the preview. We are achieving this by generating a new object of type VideoEncodingProperties:
1
2
3
4
5
6
7
8
9
10
11
12
13
14
15
16
17
18
19
20
21
22
23
24
25
26
27
28
29
30
31
private VideoEncodingProperties maxResolution()
{
    VideoEncodingProperties resolutionMax = null;

    //get all photo properties
    var resolutions = captureManager.VideoDeviceController.GetAvailableMediaStreamProperties(MediaStreamType.Photo);

    //generate new list to work with
    List<VideoEncodingProperties> vidProps = new List<VideoEncodingProperties>();

    //add only those properties that are 16:9 to our own list
    for (var i = 0; i < resolutions.Count; i++)
    {
        VideoEncodingProperties res = (VideoEncodingProperties)resolutions[i];

        if (MatchScreenFormat(new Size(res.Width, res.Height)) != CameraResolutionFormat.FourByThree)
        {
            vidProps.Add(res);
        }
    }

    //order the list, and select the highest resolution that fits our limit
    if (vidProps.Count != 0)
    {
        vidProps = vidProps.OrderByDescending(r => r.Width).ToList();

        resolutionMax = vidProps.Where(r => r.Width < 2600).First();
    }

    return resolutionMax;
}
What I am doing here: I read all available VideoEncodingProperties for the MediaStreamType Photo. As I mentioned before, we need only wide screen resolution for Windows Phone, that’s why I add only those that have not a 4:3 ratio to my list. Then I am using LINQ to order the list and select the highest resolution from that list.
Using this helper is also very easy, done with one line of code before starting the preview and best also before rotating the preview:
1
 await captureManager.VideoDeviceController.SetMediaStreamPropertiesAsync(MediaStreamType.Photo, maxResolution());
This way, we are able to respect any resolution limits that we might face while developing our app, while keeping the photo quality as high as possible.
1
2
3
4
5
6
7
8
9
10
11
12
13
14
15
16
private CameraResolutionFormat MatchScreenFormat(Size resolution)
{
    CameraResolutionFormat result = CameraResolutionFormat.Unknown;

    double relation = Math.Max(resolution.Width, resolution.Height) / Math.Min(resolution.Width, resolution.Height);
    if (Math.Abs(relation - (4.0 / 3.0)) < 0.01)
    {
        result = CameraResolutionFormat.FourByThree;
    }
    else if (Math.Abs(relation - (16.0 / 9.0)) < 0.01)
    {
        result = CameraResolutionFormat.SixteenByNine;
    }

    return result;
}
Focus
Focusing on objects in your photo is quite important. Sadly, it seems that currently we are not able to have a one solution fits all devices solution for using AutoFocus. I experimented a lot with it, and finally I got aware of known issues with Nokia drivers and the new MediaCapture API’s, as described here. Microsoft is working with Nokia (or their devices department) to fix this problem.
The only solution I got working for an Runtime app is to use manual focus. All other attempts gave me one Exception after the other, be it on cancelling the preview or be it on while previewing itself. I’ll write another post on how to use the AutoFocus as soon as it is working like it should. In the meantime, here is my solution for manual focusing.
First, add a Slider control in your XAML page:
1
 <Slider x:Name="FocusValueSlider" Maximum="1000" Minimum="0" Grid.Row="0" Margin="12,0,15,0" Header="adjust focus:" ValueChanged="FocusValueSlider_ValueChanged" Value="500" SmallChange="25" LargeChange="100" ></Slider>
Notice that as with any slider, you need to follow the order: Set Maximum first, then Minimum. If you do not, you will likely get an unusable Slider in return. If the VideoDeviceController.Focus property would work (seems like it is also affected by the above mentioned driver problems), we could read and set the Slider values from its MediaDeviceControl.Capabilities property. I tried to read them at any stage of previewing, but their values are always 0.0, null and false. The range up to 1000 fits in very well on all devices I tested (Lumia 920, 930 and 1020).
Ok, enough of whining. Let’s have a look at my solution. First, we need to generate a small helper that allows us to adjust the focus based on the slider values:
1
2
3
4
5
6
7
8
9
10
11
12
13
14
15
16
17
18
19
20
21
22
23
24
25
private async void SetFocus(uint? focusValue = null)
{
    //try catch used to avoid app crash at startup when no CaptureElement is active
    try
    {
        //setting default value
        if (!focusValue.HasValue)
        {
            focusValue = 500;
        }

        //check if the devices camera supports focus control
        if (captureManager.VideoDeviceController.FocusControl.Supported)
        {
            //disable flash assist for focus control
            captureManager.VideoDeviceController.FlashControl.AssistantLightEnabled = false;

            //configure the FocusControl to manual mode
            captureManager.VideoDeviceController.FocusControl.Configure(new FocusSettings() { Mode = FocusMode.Manual, Value = focusValue, DisableDriverFallback = true });
            //update the focus on our MediaCapture
            await captureManager.VideoDeviceController.FocusControl.FocusAsync();
        }
    }
    catch { }
}
This methods checks if the current camera supports Focus, and sets its value according to the slider. The AssistantLight is disabled in this case. Its default is enabled (true).
To add the possibility to adjust the focus, we need to configure our own FocusSettings that tell the camera that we are focusing manually based on the slider’s value. Finally, we need to perform the focusing action by calling the FocusControl’s FocusAsync method.
The next step is to hook up to changes in the slider values within the FocusValueSlider_ValueChanged event:
1
2
3
4
5
6
7
8
9
10
11
12
13
private void FocusValueSlider_ValueChanged(object sender, RangeBaseValueChangedEventArgs e)
{
    try
    {
        //convert double e.NewValue to uint and call SetFocus()
        uint focus = Convert.ToUInt32(e.NewValue);
        SetFocus(focus);
    }
    catch
    {

    }
}
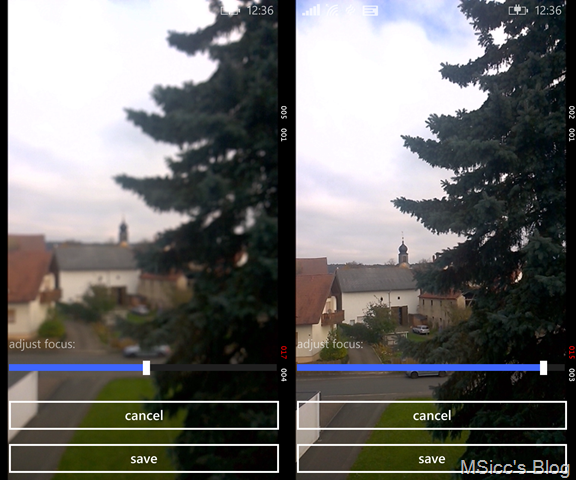
Now every move of the slider will change the focus of the preview and of course also of the captured photo (which we will learn more about in the third post of this series). To initialize our Focus correctly with the value of 500 we set in XAML, just call SetFocus(); before you start the preview. Here is the result:
Disclaimer: I do not know if this follows best practices, but it works. If you have feedback for the above mentioned code snippets, feel free to leave a comment below.
In the third and last post I’ll show you how to save the images (also in different folders or only within the app).
Until then, happy coding!


