A faster way to add image assets to your Xamarin.iOS project in Visual Studio 2017
While Visual Studio has an editor that shall help to add new image assets to the project, it is pretty slow when adding a bunch of new images. If you have to add a lot of images to add, it even crashes once in while, which can be annoying. Because I was in the process of adding more than a hundred images for porting my first app ever from Windows Phone to iOS and Android, I searched for a faster way – and found it.
What’s going on under the hood?
When you add an imageset to your assets structure, Visual Studio does quite some work. These are the steps that are done:
- creation of a folder for the
imagesetin the Assets folder - creation of a
Contents.jsonfile - modification of the
Contents.jsonfile - modification of the .csproj file
This takes some time for every image, and Visual Studio seems to be quite busy with these steps. After analyzing the way imagesets get added, I immediately recognized that I am faster than Visual Studio if I do that work manually.
How to add the assets – step by step
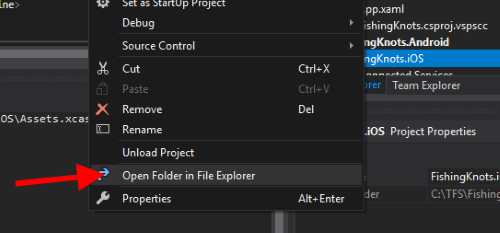
right click on the project in Solution Explorer and select ‘Open Folder in File Explorer‘ and find the ‘Assets‘ folder
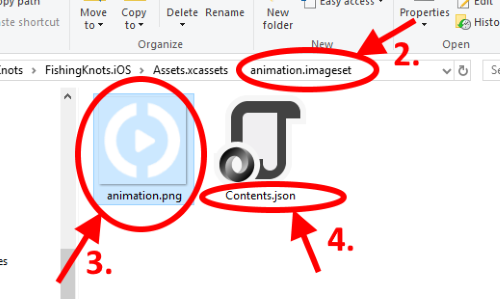
- create a new folder in this format: ‘[yourassetname].imageset‘
- add your image to the folder
- open the file (I use Notepad++ for such operations) and add this minimum required
jsonto it:1 2 3 4 5 6 7 8 9 10 11 12 13 14 15 16 17 18 19 20 21 22 23 24 25 26 27 28 29
{ "images": [ { "scale": "1x", "idiom": "universal", "filename": "[yourimage].png" }, { "scale": "2x", "idiom": "universal", "filename": "[yourimage].png" }, { "scale": "3x", "idiom": "universal", "filename": "[yourimage].png" }, { "idiom": "universal" } ], "properties": { "template-rendering-intent": "" }, "info": { "version": 1, "author": "" } }
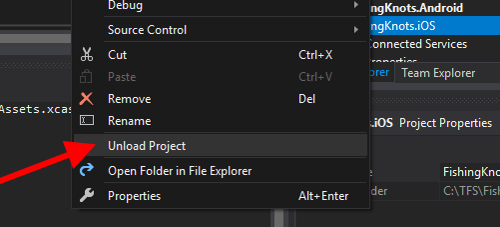
go back to Visual Studio, right click on the project again and select ‘Unload Project‘
right click again and select ‘Edit [yourprojectname].iOS.csproj‘
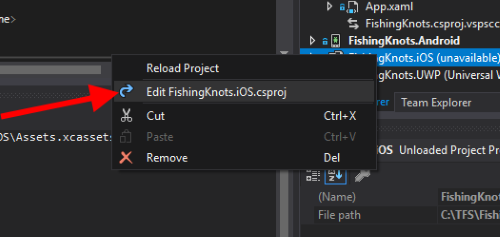
- find the
ItemGroupwith the Assets - inside the
ItemGroup, add yourimagesetwith these two entries:1 2 3 4 5 6
<ImageAsset Include="Assets.xcassets\[yourassetname].imageset\[yourimage].png"> <Visible>false</Visible> </ImageAsset> <ImageAsset Include="Assets.xcassets\[yourassetname].imageset\Contents.json"> <Visible>false</Visible> </ImageAsset>
- close the file and reload the project by selecting it from the context menu in Solution Explorer
If you followed this steps, your assets should be visible immediately:
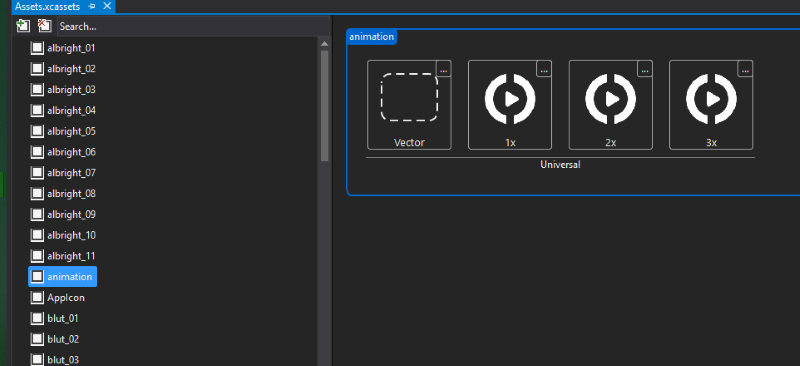
I did not measure the time exactly, but I felt I was significantly faster by adding all those images that way. Your mileage may vary, depending on the power of your dev machine.
Conclusion
Features like the AssetManager for iOS in Visual Studio are nice to have, but some have some serious performance problems (most of them are already known). By taking over the process manually, one can be a lot faster than a built-in feature. That said, like always, I hope this post is helpful for some of you.
