Xamarin: Resources of an Android app project
As I mentioned already in my first blog post about Xamarin, Android has a different project structure – even if you use Xamarin.
A very important part of this structure are resources. We have different kind of resources in an Android app:
- Icons & Images
- Layout (XML files)
- Values (string resource files)
Let’s start with Icons & Images.
As you can see in the solution window, there is a folder called ‘Resources’. Here you will put all kind of resources, like images, icons, layouts and so on.
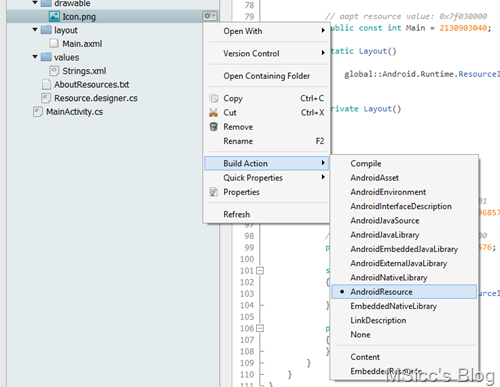
The corresponding class for images in Android is called ‘drawable’, that holds a reference to’ Icon.png’. The project structure is based on that, that’s why the resources folder has all images inside the folder ‘drawable’. As Android has various screen sizes, you may have a folder for structure like ‘drawable’, ‘drawable-hdpi, ‘drawable-ldpi’ and so on. Android scales your image resources to match the screen automatically if you do not define alternate layouts.
To make your files available in your app, you need to set the Build Action to ‘Android Resource’:
Let’s have a look to the Layout files:
Layout files are XML files that contain the UI of a page, control or a view. You can use these XML files for example to define items of a ListView or simply the application page. Every new project has a ‘Main.axml’ file.
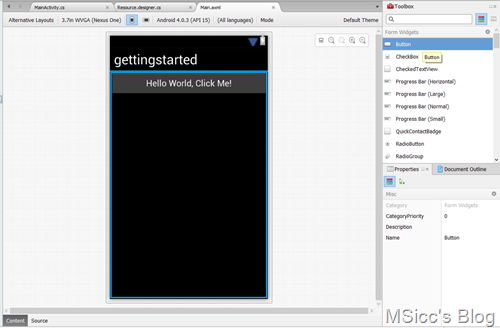
There are two ways to create a layout. The first one is using the visual designer:
This works for basic layouts like adding the button above. Also, if you don’t know the properties of a control you added, you will be able to add it here to get started.
If you are familiar with writing your UI in code (like XAML) and want to do so in your Android app, just click the ‘Source’ tab at the bottom in the visual designer. You will see something like this:
1
2
3
4
5
6
7
8
9
10
11
<?xml version="1.0" encoding="utf-8"?>
<LinearLayout xmlns:android="https://schemas.android.com/apk/res/android"
android:orientation="vertical"
android:layout_width="fill_parent"
android:layout_height="fill_parent">
<Button
android:id="@+id/myButton"
android:layout_width="fill_parent"
android:layout_height="wrap_content"
android:text="@string/hello" />
</LinearLayout>
If you want to add and modify a control, but don’t know how the properties are, this page has a list of all controls, which are called ‘widgets’ in Android. That’s also the corresponding namespace: android.widget.
Like in an Windows Phone app, you also have a string resource file in Android projects. This file is once again a XML file, but with a different structure:
1
2
3
4
5
<?xml version="1.0" encoding="utf-8"?>
<resources>
<string name="hello">Hello World, Click Me!</string>
<string name="app_name">gettingstarted</string>
</resources>
All strings need to be declared inside the <resources> tag. The definition is always like <string name=”yourstringname”>stringcontent</string>. Empty strings are not supported and will throw an error at building your project.
Let’s have a look on how we can work with our resources, based on our gettingstarted project. We have the following code inside our MainActivity class:
1
2
3
4
5
6
7
8
9
10
11
12
13
14
15
16
17
18
int count = 1;

protected override void OnCreate (Bundle bundle)
{
    base.OnCreate (bundle);

    // Set our view from the "main" layout resource
    SetContentView (Resource.Layout.Main);

    // Get our button from the layout resource,
    // and attach an event to it
    Button button = FindViewById<Button> (Resource.Id.myButton);
    button.Text = GetString (Resource.String.hello);

    button.Click += delegate {
        button.Text = string.Format ("{0} clicks!", count++);
    };
}
As you can see, the we are defining our view from our Layout file ‘Main.axml’ by using the SetContentView() method. The file is added to our resources list as Layout with the name we defined.
Our MainActivity does not know that we have a button inside our layout. To make the button visible to our MainActivity, we need to reference it. This is done by declaring a Button instance and using the FindViewById<T>(ResourceName) method.
If you have not given your button a name, now is the right time to do so. In our example the button has the name “myButton”. The syntax is very important, make sure you add “@+id/” to the name.
1
android:id="@+id/myButton"
Now our button is visible to our MainActivity code page and can be accessed. The sample project references the button content in the Layout file:
1
android:text="@string/hello"
After referencing our button, we could also use the following code to get the button content from the resource file:
1
button.Text = GetString (Resource.String.hello);
Whenever your want to get a string from the resource file in an Activity, the GetString() method is used.
I hope this post helps you to understand how resources are used in an Android app and how to handle it a Xamarin project.
Happy coding everyone!

