Use NuGets for your common Xamarin (Forms) code (and automate the creation process)
Internal libraries
Writing (or copy and pasting) the same code over and over again is one of those things I try to avoid when writing code. For quite some time, I already organize such code in libraries. Until last year, this required quite some work managing all libraries for each Xamarin platform I used. Luckily, the MSBuild SDK Extras extensions showed up and made everything a whole lot easier, especially after James Montemagno did a detailed explanation on how to get the most out of it for Xamarin plugins/libraries.
Getting started
Even if I repeat some of the steps of James’ post, I’ll start from scratch on the setup part here. I hope to make the whole process straight forward for everyone – that’s why I think it makes sense to show each and every step. Please make sure you are using the new .csproj type. If you need a refresh on that, you can check my post about migrating to it (if needed).
MSBuild.Sdk.Extras
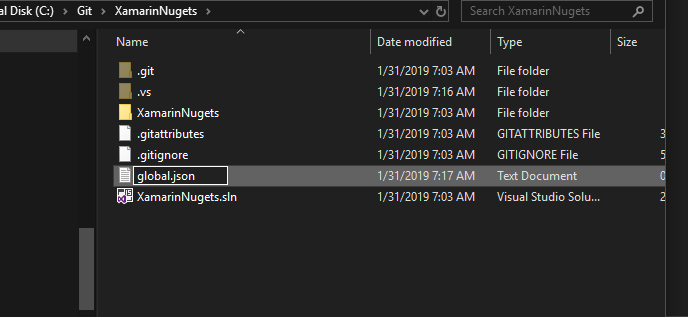
The first step is pulling in MSBuild.Sdk.Extras, which will enable us to target multiple platforms in one single library. For this, we need a global.json file in the solution folder. Right click on the solution name and select ‘Open Folder in File Explorer‘, then just add a new text file and name it appropriately.
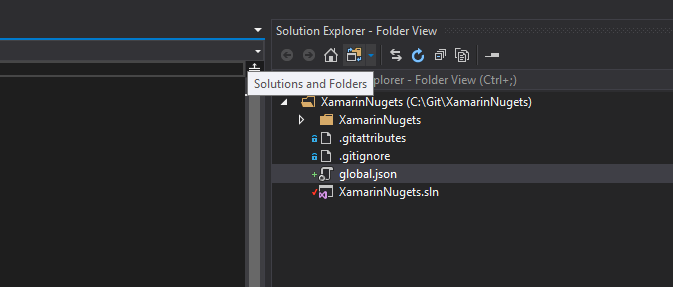
 The next step is to define the version of the MSBuild.SDK.Extras library we want to use. The current version is 1.6.65, so let’s define it in the file. Just click the ‘Solution and Folders‘ button to find the file in Visual Studio:
 Add these lines into the file and save it:
1
2
3
4
5
 {
  "msbuild-sdks": {
    "MSBuild.Sdk.Extras": "1.6.65"
  }
}
Modifying the project file
Switch back to the Solution view and right click on the .csproj file. Select ‘Edit [ProjectName].csproj‘. Let’s modify and add the project definitions. We’ll start right in the first line. Replace the first line to pull in the MSBuild.Sdk.Extras:
1
 <Project Sdk="MSBuild.Sdk.Extras">
Next, we’re separating Version
1
2
3
4
   <!--separated for accessibility-->
  <PropertyGroup>
    <Version>1.0.0.0</Version>
  </PropertyGroup>
Now we are enabling multiple targets, in this
1
2
3
4
5
6
7
8
9
10
   <!--make it multi-platform library!-->
  <PropertyGroup>
    <UseFullSemVerForNuGet>false</UseFullSemVerForNuGet>
    <!--we are handling compile items ourselves below with a custom naming scheme-->
    <EnableDefaultCompileItems>false</EnableDefaultCompileItems>
    <KEEP ALL THREE IF YOU ADD UWP!-->
    <TargetFrameworks></TargetFrameworks>
    <TargetFrameworks Condition=" '$(OS)' == 'Windows_NT' ">netstandard2.0;MonoAndroid81;Xamarin.iOS10;uap10.0.16299;</TargetFrameworks>
    <TargetFrameworks Condition=" '$(OS)' != 'Windows_NT' ">netstandard2.0;MonoAndroid81;Xamarin.iOS10;</TargetFrameworks>
  </PropertyGroup>
Now we will add some default NuGet packages
[Class].[platform].cs
This way, we are able to add all platform specific code together with the shared entry point in a single folder. Let’ start with shared items. These will be available on all platforms listed in the PropertyGroup above:
1
2
3
4
5
6
7
8
9
10
11
12
13
   <!--shared items-->
  <ItemGroup>
    <!--keeping this one ensures everything goes smooth-->
    <PackageReference Include="MSBuild.Sdk.Extras" Version="1.6.65" PrivateAssets="All" />

    <!--most commonly used (by me)-->
    <PackageReference Include="Xamarin.Forms" Version="3.4.0.1029999" />
    <PackageReference Include="Xamarin.Essentials" Version="1.0.1" />

    <!--include content, exclude obj and bin folders-->
    <None Include="**\*.cs;**\*.xml;**\*.axml;**\*.png;**\*.xaml" Exclude="obj\**\*.*;bin\**\*.*;bin;obj" />
    <Compile Include="**\*.shared.cs" />
  </ItemGroup>
The ‘**\‘ part in the Include property of the Compile tag ensures MSBuild includes also classes in subfolders. Now let’s add some platform specific rules to the project:
1
2
3
4
5
6
7
8
9
10
11
12
13
14
15
16
17
18
19
20
21
22
23
24
25
26
27
28
29
30
31
32
33
34
   <ItemGroup Condition=" $(TargetFramework.StartsWith('netstandard')) ">
    <Compile Include="**\*.netstandard.cs" />
  </ItemGroup>

  <ItemGroup Condition=" $(TargetFramework.StartsWith('uap10.0')) ">
    <PackageReference Include="Microsoft.NETCore.UniversalWindowsPlatform" Version="6.1.9" />
    <Compile Include="**\*.uwp.cs" />
  </ItemGroup>

  <ItemGroup Condition=" $(TargetFramework.StartsWith('MonoAndroid')) ">
    <!--need to reference all those libs to get latest minimum Android SDK version (requirement by Google)... #sigh-->
    <PackageReference Include="Xamarin.Android.Support.Annotations" Version="28.0.0.1" />
    <PackageReference Include="Xamarin.Android.Support.Compat" Version="28.0.0.1" />
    <PackageReference Include="Xamarin.Android.Support.Core.Utils" Version="28.0.0.1" />
    <PackageReference Include="Xamarin.Android.Support.CustomTabs" Version="28.0.0.1" />
    <PackageReference Include="Xamarin.Android.Support.v4" Version="28.0.0.1" />
    <PackageReference Include="Xamarin.Android.Support.Design" Version="28.0.0.1" />
    <PackageReference Include="Xamarin.Android.Support.v7.AppCompat" Version="28.0.0.1" />
    <PackageReference Include="Xamarin.Android.Support.v7.CardView" Version="28.0.0.1" />
    <PackageReference Include="Xamarin.Android.Support.v7.Palette" Version="28.0.0.1" />
    <PackageReference Include="Xamarin.Android.Support.v7.MediaRouter" Version="28.0.0.1" />
    <PackageReference Include="Xamarin.Android.Support.Core.UI" Version="28.0.0.1" />
    <PackageReference Include="Xamarin.Android.Support.Fragment" Version="28.0.0.1" />
    <PackageReference Include="Xamarin.Android.Support.Media.Compat" Version="28.0.0.1" />
    <PackageReference Include="Xamarin.Android.Support.v7.RecyclerView" Version="28.0.0.1" />
    <PackageReference Include="Xamarin.Android.Support.Transition" Version="28.0.0.1" />
    <PackageReference Include="Xamarin.Android.Support.Vector.Drawable" Version="28.0.0.1" />
    <PackageReference Include="Xamarin.Android.Support.Vector.Drawable" Version="28.0.0.1" />
    <Compile Include="**\*.android.cs" />
  </ItemGroup>

  <ItemGroup Condition=" $(TargetFramework.StartsWith('Xamarin.iOS')) ">
    <Compile Include="**\*.ios.cs" />
  </ItemGroup>
Two side notes:
- Do not reference version 6.2.2 of the
Microsoft.NETCore.UniversalWindowsPlatformNuGet. There seems to bebug in there that will lead to rejection of your app from the Microsoft Store. Just keep 6.1.9 (for the moment). - You may not need all of the
Xamarin.Androidpackages, but there are a bunch of dependencies between them and others, so I decided to keep them all
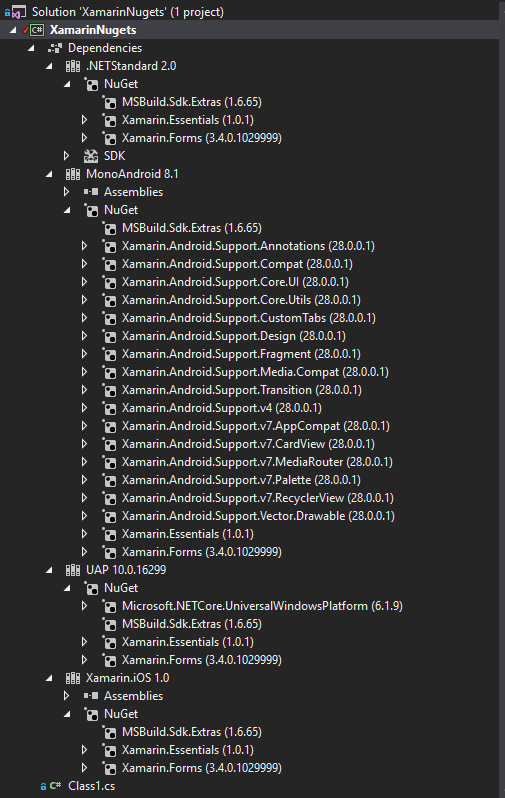
If you have followed along, hit the save button and close the .csproj file. Verifying everything went well is pretty easy – your solution structure should look like this:
 Before we’ll have a look at the NuGet creation part of this post, let’s add some sample code. Just insert this into static partial classes with the appropriate naming scheme for every platform and edit the code to match the platform. The .shared version of this should be empty (for this sample).
1
2
3
4
5
6
7
8
9
10
11
12
13
14
      public static partial class Hello
    {
        public static string Name { get; set; }

        public static string Platform { get; set; }

        public static  void Print()
        {
            if (!string.IsNullOrEmpty(Name) && !string.IsNullOrEmpty(Platform))
                System.Diagnostics.Debug.WriteLine($"Hello {Name} from {Platform}");
            else
                System.Diagnostics.Debug.WriteLine($"Hello unkown person from {Device.Android}");
        }
    }
Normally, this would be a Renderer or other platform specific code. You should get the idea.
Preparing NuGet package creation
We will now prepare our solution to automatically generate NuGet packages both for DEBUG and RELEASE configurations. Once the packages are created, we will push it to a local (or network) file folder, which serves as our local NuGet-Server. This will fit for most Indie-developers – which tend to not replicate a full blown enterprise infrastructure for their DevOps needs. I will also mention how you could push the packages to an internal NuGet server on a sideline (we are using a similar setup at work).
Adding NuGet Push configurations
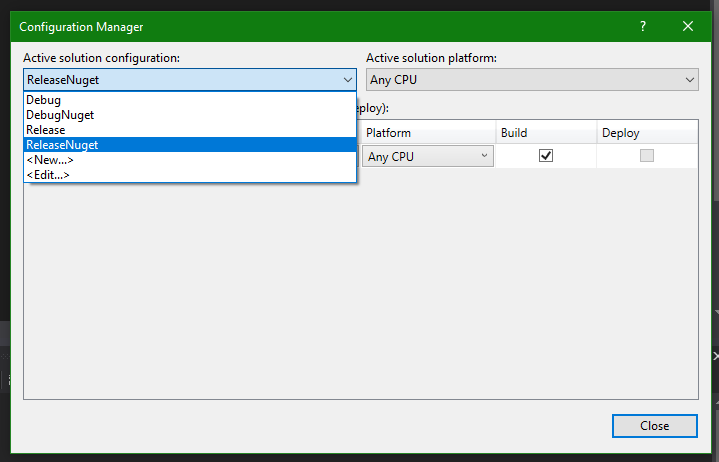
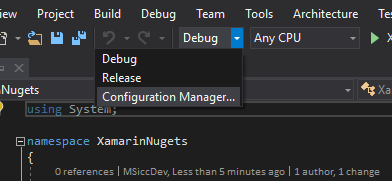
One thing we want to make sure is that we are not going to push packages on every compilation of our library. That’s why we need to separate configurations. To add new configurations, open the Configuration Manager in Visual Studio:
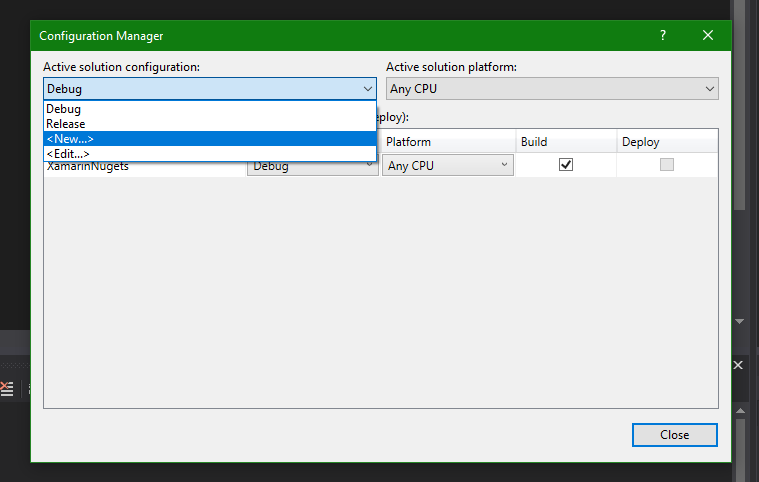
 In the Configuration Manager dialog, select the ‘<New…>‘ option from the ‘Active solution configuration‘ ComboBox:
 Name the new config to fit your needs, I just use
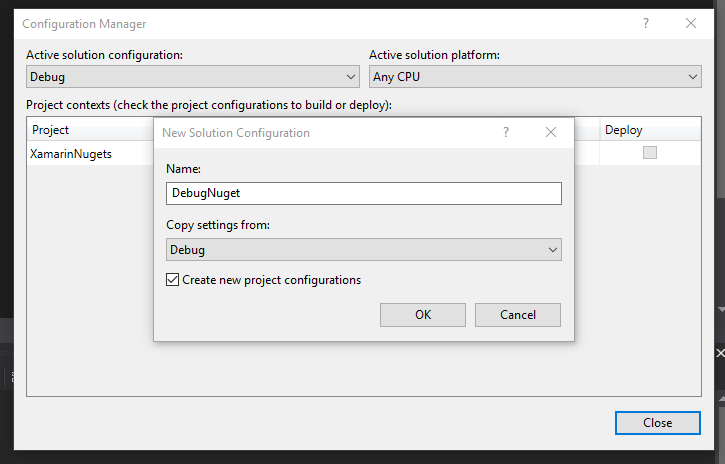 The result should look like this:
Modifying the project file (again)
If you head over to your project file, you will see the Configurations tag has new entries:
1
2
3
   <PropertyGroup>
    <Configurations>Debug;Release;DebugNuget;ReleaseNuget</Configurations>
  </PropertyGroup>
Next, add the properties of your assembly and package:
1
2
3
4
5
6
7
8
9
10
11
12
13
14
15
16
17
18
19
20
21
22
23
24
25
26
27
28
29
     <!--assmebly properties-->
  <PropertyGroup>
    <AssemblyName>XamarinNugets</AssemblyName>
    <RootNamespace>XamarinNugets</RootNamespace>
    <Product>XamarinNugets</Product>
    <AssemblyVersion>$(Version)</AssemblyVersion>
    <AssemblyFileVersion>$(Version)</AssemblyFileVersion>
    <NeutralLanguage>en</NeutralLanguage>
    <LangVersion>7.1</LangVersion>
  </PropertyGroup>

  <!--nuget package properties-->
  <PropertyGroup>
    <PackageId>XamarinNugets</PackageId>
    <PackageLicenseUrl>https://github.com/MSiccDevXamarinNugets</PackageLicenseUrl>
    <PackageProjectUrl>https://github.com/MSiccDevXamarinNugets</PackageProjectUrl>
    <RepositoryUrl>https://github.com/MSiccDevXamarinNugets</RepositoryUrl>

    <PackageReleaseNotes>Xamarin Nugets sample package</PackageReleaseNotes>
    <PackageTags>xamarin, windows, ios, android, xamarin.forms, plugin</PackageTags>

    <Title>Xamarin Nugets</Title>
    <Summary>Xamarin Nugets sample package</Summary>
    <Description>Xamarin Nugets sample package</Description>

    <Owners>MSiccDev Software Development</Owners>
    <Authors>MSiccDev Software Development</Authors>
    <Copyright>MSiccDev Software Development</Copyright>
  </PropertyGroup>
Configuration specific properties
Now we will add some configuration specific PropertyGroups that control if a package will be created.
Debug and DebugNuget
1
2
3
4
5
6
7
8
9
10
11
12
13
14
15
16
17
18
19
20
21
22
23
   <PropertyGroup Condition=" '$(Configuration)'=='Debug' ">
    <DefineConstants>DEBUG</DefineConstants>
    <!--making this pre-release-->
    <PackageVersion>$(Version)-pre</PackageVersion>
    <!--needed for debugging!-->
    <DebugType>full</DebugType>
    <DebugSymbols>true</DebugSymbols>
  </PropertyGroup>

  <PropertyGroup Condition=" '$(Configuration)'=='DebugNuget' ">
    <DefineConstants>DEBUG</DefineConstants>
    <!--enable package creation-->
    <GeneratePackageOnBuild>true</GeneratePackageOnBuild>
    <!--making this pre-release-->
    <PackageVersion>$(Version)-pre</PackageVersion>
    <!--needed for debugging!-->
    <DebugType>full</DebugType>
    <DebugSymbols>true</DebugSymbols>
    <GenerateDocumentationFile>false</GenerateDocumentationFile>
    <!--this makes msbuild creating src folder inside the symbols package-->
    <IncludeSource>True</IncludeSource>
    <IncludeSymbols>True</IncludeSymbols>
  </PropertyGroup>
The Debug configuration enables us to step into the Debug code while we are referencing the project directly during development, while the
Release and ReleaseNuget
1
2
3
4
5
6
7
8
9
10
11
12
13
14
   <PropertyGroup Condition=" '$(Configuration)'=='Release' ">
    <DefineConstants>RELEASE</DefineConstants>
    <PackageVersion>$(Version)</PackageVersion>
  </PropertyGroup>

  <PropertyGroup Condition=" '$(Configuration)'=='ReleaseNuget' ">
    <DefineConstants>RELEASE</DefineConstants>
    <PackageVersion>$(Version)</PackageVersion>
    <!--enable package creation-->
    <GeneratePackageOnBuild>true</GeneratePackageOnBuild>
    <!--include pdb for analytic services-->
    <DebugType>pdbonly</DebugType>
    <GenerateDocumentationFile>true</GenerateDocumentationFile>
  </PropertyGroup>
The
Adding Build Targets
We are close to
1
2
3
4
5
6
7
8
   <!--cleaning older nugets-->
  <Target Name="CleanOldNupkg" BeforeTargets="Build">
    <ItemGroup>
      <FilesToDelete Include="$(ProjectDir)$(BaseOutputPath)$(Configuration)\$(AssemblyName).*.nupkg"></FilesToDelete>
    </ItemGroup>
    <Delete Files="@(FilesToDelete)" />
    <Message Text="Old nupkg in $(ProjectDir)$(BaseOutputPath)$(Configuration) deleted." Importance="High"></Message>
  </Target>
MSBuild provides a lot of options to configure. We are setting the BeforeTargets property of the target to Build, so once we Clean/Build/Rebuild, all old packages will be deleted by the Delete command. Finally, we are printing a message to confirm the deletion.
Pushing the packages
After completing all these steps above, we are ready to distribute our packages. In our case, we are copying the packages to a local folder with the Copy command.
1
2
3
4
5
6
7
8
9
10
11
12
13
14
15
16
   <!--pushing to local folder (or network path)-->
  <Target Name="PushDebug" AfterTargets="Pack" Condition="'$(Configuration)'=='DebugNuget'">
    <ItemGroup>
      <PackageToCopy Include="$(ProjectDir)$(BaseOutputPath)$(Configuration)\$(AssemblyName).*.symbols.nupkg"></PackageToCopy>
    </ItemGroup>
    <Copy SourceFiles="@(PackageToCopy)" DestinationFolder="C:\TempLocNuget" />
    <Message Text="Copied '@(PackageToCopy)' to local Nuget folder" Importance="High"></Message>
  </Target>

  <Target Name="PushRelease" AfterTargets="Pack" Condition="'$(Configuration)'=='ReleaseNuget'">
    <ItemGroup>
      <PackageToCopy Include="$(ProjectDir)$(BaseOutputPath)$(Configuration)\$(AssemblyName).*.nupkg"></PackageToCopy>
    </ItemGroup>
    <Copy SourceFiles="@(PackageToCopy)" DestinationFolder="C:\TempLocNuget" />
    <Message Text="Copied '@(PackageToCopy)' to local Nuget folder" Importance="High"></Message>
  </Target>
Please note that the local folder could be replaced by a network path. You have to ensure the availability of that path – which adds in some additional work if you choose this route.
If you’re running a full NuGet server (as often happens in Enterprise environments), you can push the packages with this command (instead of the Copy command):
1
 <Exec Command="NuGet push "$(ProjectDir)$(BaseOutputPath)$(Configuration)\$(AssemblyName).*.symbols.nupkg" [YourPublishKey] -Source [YourNugetServerUrl]" />
The result
If we now select the DebugNuget/ReleaseNuget configuration, Visual Studio will create our NuGet package and push it to our Nuget folder/server:
 Let’s have a look into the NuGet package as well. Open your file location defined above and search your package:
 As you can see, the
 Copy command executed successfully. To inspect NuGet packages, you need the NuGet Package Explorer app. Once installed, just double click the package to view its contents. Your result should be similar to this for the DebugNuGet package:
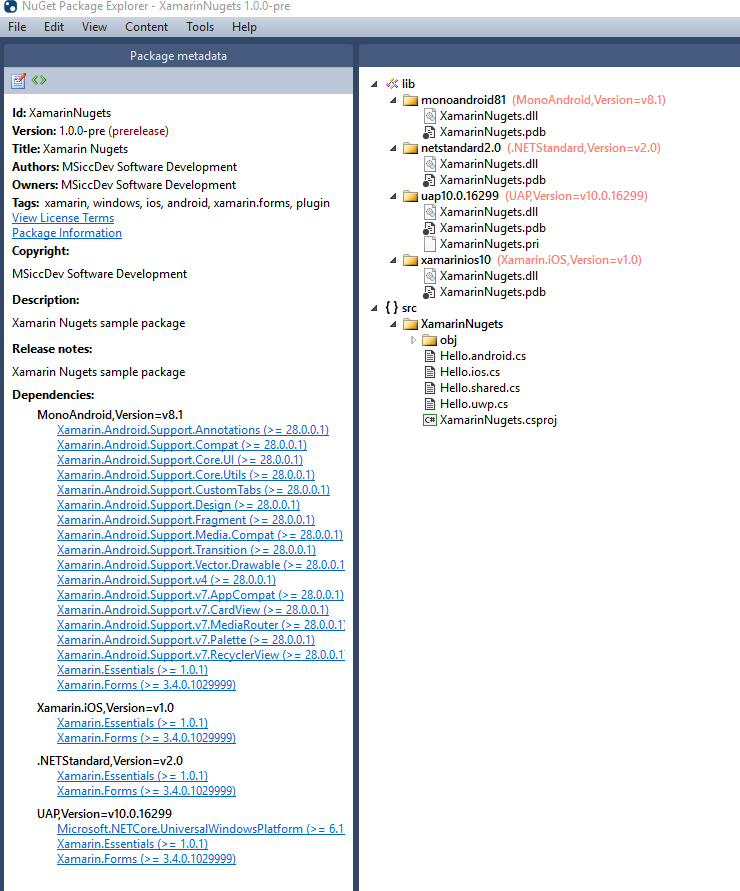 As you can see, we have both the .pdb files as well as the source in our package as intended.
Conclusion
Even as an Indie developer, you can take advantage of the DevOps options provided with Visual Studio and MSBuild. The MSBuild.Sdk.Extras package enables us to maintain a multi-targeting package for our Xamarin(.Forms) code. The whole process needs some setup, but once you have performed the steps above, extending your libraries is just fast forward.
I planned to write this post for quite some time, and I am happy with doing it as my contribution to the #XamarinMonth (initiated by Luis Matos). As always, I hope this post is helpful for some of you. Feel free to clone and play with the full sample I uploaded on Github.
Until the next post, happy coding, everyone!
Helpful links:
- MSBuild Reference
- MSBuild.Sdk.Extras (Github)
- James Montegmano’s Post on
[multi targeting](https://montemagno.com/converting-xamarin-libraries-to-sdk-style-multi-targeted-projects/) libraries - NuGet documentation: Create packages
- NuGet documentation: Hosting packages
P.S. Feel free to download the official app for my blog (that uses a lot of what I am blogging about):
iOS | Android | Windows 10

