Xamarin Forms, the MVVMLight Toolkit and I: migrating the Forms project and MVVMLight to .NET Standard
When I started this series, Xamarin and Xamarin.Forms did not fully support .NET Standard. The sample project for this series has still a portable class library, and as I wanted to blog on another topic, I got reminded that I never updated the project. This post will be all about the change to .NET Standard, focusing on the Xamarin.Forms project as well as the MVVMLight library, which is also available as a .NET Standard version in the meantime.
Step-by-Step
I have done the necessary conversion steps already quite a few times, and to get you through the conversion very quickly, I will show you a set of screenshots. Where applicable, I will provide also some XML snippets that you can copy and paste.
Step 1
The first step is to unload the project file. To do so, select your Xamarin Forms project in Solution Explorer and right click again on it bring up the context menu. From there, select “Unload Project“.
Step 2
Next, right-click the selected Xamarin.Forms project again to make the context menu visible once again. From there select “Edit [PROJECTNAME].csproj” to open up the file.
Step 3
Now that the file is open, press “CTRL + A”, followed by “DEL”. Seriously, just do it. Once the file is empty, copy these lines and paste them into your now empty file:
1
2
3
4
5
6
7
 <Project Sdk="Microsoft.NET.Sdk">

  <PropertyGroup>
    <TargetFramework>netstandard2.0</TargetFramework>
  </PropertyGroup>

</Project>
Step 4
This step is not really necessary, but I want to point one thing out. The old PCL-project type has listed quite a bunch of libraries in the packages.config file. These are all NuGet packages necessary to make the app actually run (they get pulled in during the install of a NuGet package as dependencies). Now that we are converting, we are getting rid of the packages.config file. You can delete right away in the Solution Explorer. We will “install” the needed packages (marked with the arrows) in
Step 5
For “installing” NuGet packages into the converted project, we are adding a new ItemGroup to the XML-File. The Package System.ValueTuple is referenced – because in this series’ sample project we have some code in there that uses it. The absolute minimum you need to get it running is:
1
2
3
4
5
6
7
8
9
10
11
12
13
 <!--
Template for Nuget Packages:
<ItemGroup>
  <PackageReference Include="" Version="" />
</ItemGroup>
-->

<ItemGroup>
  <!--MvvmLight has changed, so do we!-->
  <PackageReference Include="MvvmLightLibsStd10" Version="5.4.1" />
  <!--needed references-->
  <PackageReference Include="Xamarin.Forms" Version="3.1.0.583944" />
</ItemGroup>
If you have other NuGet packages, just add them into this item group. They will get installed in the correct version if you follow this tutorial until the end.
You might have noticed that the MVVMLight package I am inserting here is not the same as before. This is absolutely true, but for a reason. Laurent Bugnion has published the .NET Standard version quite some time ago. If you want to read his blog post, you can find it here.
The second change I want to outline is DebugTypesettings. These are also not set in that way if you create a new project that is already .NET Standard. In order to enable debugging of your Xamarin.Forms code, however, you absolutely should also add these lines:
1
2
3
4
5
6
7
8
9
10
 <!--these enable debugging in the Forms project-->
<PropertyGroup Condition=" '$(Configuration)'=='Debug' ">
  <DebugType>full</DebugType>
  <DebugSymbols>true</DebugSymbols>
  <GenerateDocumentationFile>false</GenerateDocumentationFile>
</PropertyGroup>
<PropertyGroup Condition=" '$(Configuration)'=='Release' ">
  <DebugType>pdbonly</DebugType>
  <GenerateDocumentationFile>true</GenerateDocumentationFile>
</PropertyGroup>
These properties provide the debug symbols and the pdb-files a lot of analytic services are dependent on. Simple put, copy and paste them into your project. Hit the “Save”-Button and close the file.
Step 6
Now that we have changed the project file, our already downloaded packages and created dll-files are no longer valid. To make sure we are able to compile, we need to delete the content of the obj folder in the Folder View of the Solution Explorer in Visual Studio.
Step 7
Do the same to the content of the bin folder and switch back to the Solution View by hitting the Folder View-Button again
Step 8
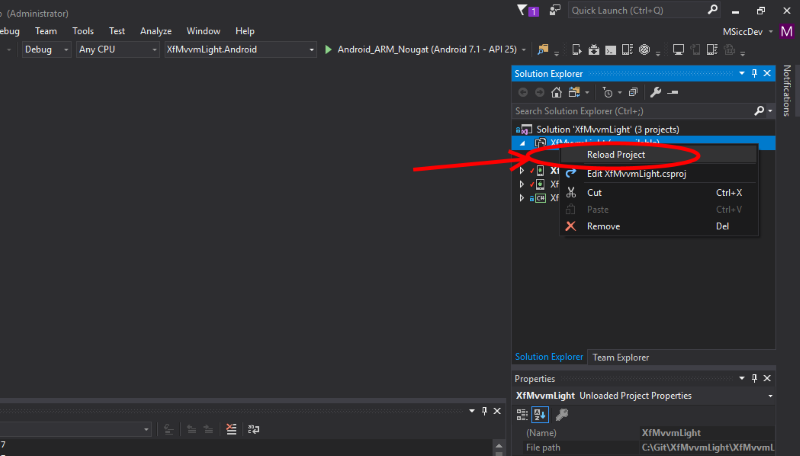
Now we are finally able to reload the project as the base conversion is already done.
Step 9
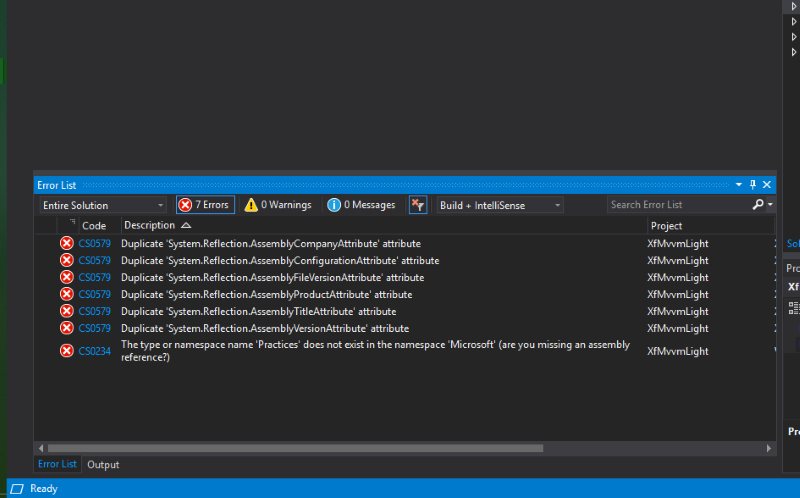
Trying to be optimistic and hit the Rebuild button will result in these (and maybe even more) errors. The first one is one that we can solve very fast, while the second one is only the first in a row of errors.
Step 10
To solve the assembly attributes error, just go to the Folder View again and select the Properties folder. Bring up the context menu by right-clicking on it and select the delete option. Confirm the deletion to get rid of the folder. The new project style creates the assembly information based on the project file during build, which is causing the errors.
Step 11
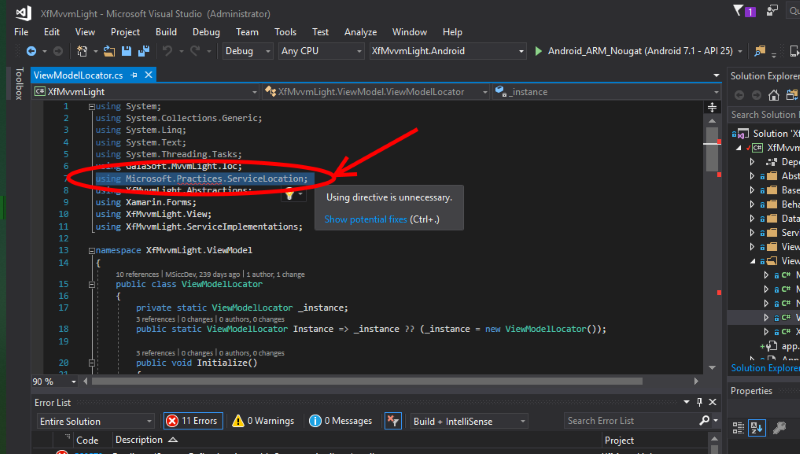
Now let’s face the next error. As the MVVMLight .NET Standard version does no longer rely on the CommonServiceLocatorlike before, we are able to remove this reference from our ViewModelLocator.
Step 12
Of course, we now can also remove the instantiation call for the removed ServiceLocator.
Step 13
In the ViewModel instance reference, replace ServiceLocator.Current with SimpleIoc.Default. Hit the save button again. You might have more errors to fix. Do so, and finally save your ViewModelLocator.
Step 14
After all the work is done, we are now able to compile the .NET Standard version of our Xamarin.Forms project. If you fixed all of your errors in the step before, you should achieve a similar result like me and get a success message.
Final steps
Now that the Xamarin.Forms project is built, you might want to try to build all other projects in the solution as well. The changed structure of the Xamarin.Forms project will have an impact also on the platform projects, that’s why I absolutely recommend deleting the contents of bin and object folders there, too. This will solve you a lot of work to get things to compile again.
As always, I hope this post is helpful for some of you. If you have any questions, feel free to ping me on my social accounts or write a comment below. The next post in this series will involve again more code, so stay tuned – it will be out soon.
Please find the updated sample project here on GitHub.


