How to modify the Background of a Telerik RadListPicker Control
In one of my current projects, I needed to change the Background of the Popup on a Telerik RadListPicker control. While it took me some time, I want to share how to achieve that to make it easier for you.
First, you need to create a copy of the RadListPicker Template. You can use either Blend or Visual Studio 2012 to achieve this.
In Blend just go to the menu and choose Object -> Edit Style -> Edit a Copy. In Visual Studio, right click on your RadListPicker in the Designer Window and choose Edit Template -> Edit a Copy.
Now you will find a new Style within your Application.Resources in App.xaml.
To change the style you have to modify two parts, the PopupHeader and the Popup itself.
To change the Background of the PopupHeader search for telerikPrimitives:RadWindow x:Name=”Popup” . Under that, you will find a Grid.
In this Grid, you will need to set the Background to the desired Color or Brush you want to use:
1
<Grid Background="#FF0A0D38" telerik:RadTileAnimation.ContainerToAnimate="{Binding ., ElementName=PopupList}">
To change the Background of the List in you ListPicker, you will have to style the Background of the underlying RadDataBoundListBox Control:
1
2
3
4
5
6
7
8
<telerikPrimitives:RadDataBoundListBox x:Name="PopupList" CheckModeDeactivatedOnBackButton="False" DisplayMemberPath="{TemplateBinding DisplayMemberPath}" IsCheckModeActive="{Binding SelectionMode, Converter={StaticResource SelectionModeToBooleanConverter}, RelativeSource={RelativeSource TemplatedParent}}" telerik:InteractionEffectManager.IsInteractionEnabled="True" ItemContainerStyle="{TemplateBinding PopupItemStyle}" Grid.Row="1" Style="{TemplateBinding PopupStyle}">
   <telerikPrimitives:RadDataBoundListBox.Background>
      <LinearGradientBrush EndPoint="0.5,1" StartPoint="0.5,0">
          <GradientStop Color="#FF0A0D38" Offset="0"/>
          <GradientStop Color="#FF9FCFEC" Offset="1"/>
      </LinearGradientBrush>
   </telerikPrimitives:RadDataBoundListBox.Background>
</telerikPrimitives:RadDataBoundListBox>
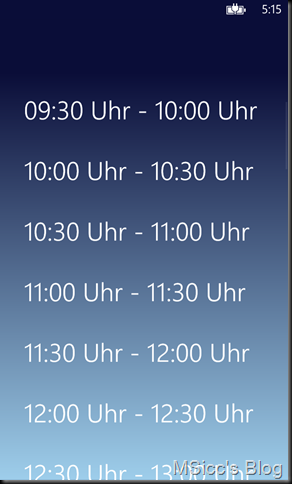
As you can see, the I changed the Background to a GradientBrush to match the rest of the application.
The result looks like this:
As always, I hope this will be helpful for some of you.
Happy coding!
