[Updated] How to create a multi architecture NuGet Package from a UWP class library
Like I already announced in my last blog post about UWP AppServices, I am going to show you how to create a NuGet package for UWP class libraries. I am going to go through the whole process, and provide you the steps I found as easiest (it may be the case that there are other ways for the single steps, too). I am continuing with my AppServices sample to show you all the steps I did.
Preparations
The first step is to download the latest NuGet.exe. This command line application will do all the work that is needed to create the package. Once downloaded, let’s do some modifications to our project.
It is good practice to put all the NuGet stuff into a folder in your project. That’s what we’re doing now, adding a folder named NuGet and put the NuGet.exe file in it (create the folder and copy and paste it in file explorer). The next step we would do now is to open the Package Manager Console in Visual Studio and call the nuget.exe with the parameter ‘spec’ to create a .nuspec file. The.xml formatted .nuspec file describes the structure of the NuGet package.
Because we need a multi architecture package for our Universal class library, I prefer another approach. I created a sample .nuspec file that already describes part of the structure that we need. After pasting the file in, change the file name to match “[projectname].nuspec”. To add the file to your project in Visual Studio, click on the ‘ Show All Files’ button on top of the Solution Explorer Window. Now you will see the previously added NuGet folder and the .nuspec file. Right click on the renamed .nuspec file and select ‘Include in Project’:
Inside the .nuspec file
Let’s have a look into the .nuspec file. The first part is the ‘metadata’ part, which describes the file’s properties:
1
2
3
4
5
6
7
8
9
10
11
12
13
     <metadata>
        <id>$title$</id>
        <version>$version$</version>
        <title>Simple Leet AppService Handler</title>
        <authors>$author$</authors>
        <owners>$owner$</owners>
        <requireLicenseAcceptance>false</requireLicenseAcceptance>
        <description>$description$</description>
        <copyright>Copyright ©  2016</copyright>

        <dependencies>
        </dependencies>
    </metadata>
Just replace the the $-enclosed variables with your data. The more interesting part in this case is the dependencies part. With the Universal app platform, Microsoft introduced the .NETCore package that provides all the APIs. It is very hard to maintain the dependencies manually. Luckily, there is already a Nuget package that helps us to automate this process: NuSpec Dependency Generator.
Just add the package to your project and compile it. That’s it, you have all the dependencies in your .nuspec file:
1
2
3
4
5
6
7
8
     <dependencies>
      <group targetFramework="uap10.0">
        <dependency id="System.Diagnostics.Debug" version="4.0.10" />
        <dependency id="System.Runtime" version="4.0.20" />
        <dependency id="System.Runtime.WindowsRuntime" version="4.0.10" />
        <dependency id="System.Threading.Tasks" version="4.0.10" />
      </group>
    </dependencies>
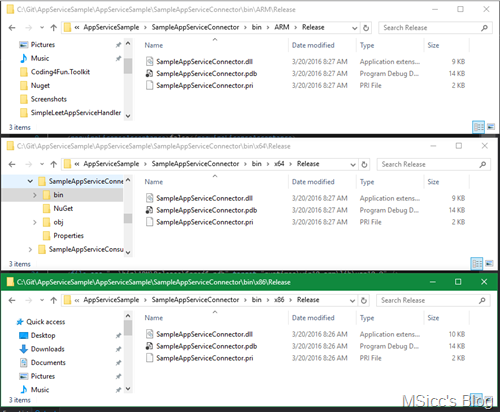
Now that we have the dependencies in place, we’re ready for the next step: creating the package file structure. As we want a multi architecture package, we need to compile the project for every cpu architecture. This is done pretty simple, just select Release mode and build the project for all architectures:
To check if we have all files in place, just open the corresponding architectures’ folder in the bin folder of your project:
The next part is to add these folders to the .nuspec file within the ‘files’ tag:
1
2
3
4
5
6
7
8
   <files>
    <file src="..\bin\ARM\Release\SampleAppServiceConnector.dll" target="runtimes\win10-arm\lib\uap10.0" />
    <file src="..\bin\ARM\Release\SampleAppServiceConnector.pdb" target="runtimes\win10-arm\lib\uap10.0" />
    <file src="..\bin\x64\Release\SampleAppServiceConnector.dll" target="runtimes\win10-x64\lib\uap10.0" />
    <file src="..\bin\x64\Release\SampleAppServiceConnector.pdb" target="runtimes\win10-x64\lib\uap10.0" />
    <file src="..\bin\x86\Release\SampleAppServiceConnector.dll" target="runtimes\win10-x86\lib\uap10.0" />
    <file src="..\bin\x86\Release\SampleAppServiceConnector.pdb" target="runtimes\win10-x86\lib\uap10.0" />
  </files>
Noticed that we use the ‘runtimes’ folder with the corresponding architecture structure folders? This is how we need to set it up for multi architectural packages. Including the .pdb files is always a good practice, even with the missing symbolication in UWP applications (at least for now. I was told from inside Microsoft that they are working on this, but it seems to be a very complicated process for .NET native compiled applications).
Very important: the entry reference
This alone does not work, though. We need a reference that we can use as entry point for our package. To do this, we need to add an additional folder entry to our .nuspec file:
1
2
     <file src="..\bin\Release\SampleAppServiceConnector.dll" target="ref\uap10.0" />
    <file src="..\bin\Release\SampleAppServiceConnector.pri" target="ref\uap10.0" />
[Update:] Now that we have added this folder structure to the .nuspec file, the only thing we need to do is add an AnyCPU compiled .dll. Regarding some feedback I received on Twitter, it should work if you compile the library as AnyCPU like a lot of devs are used to. I you do not have success with that like me, you can also convert the x86 .dll into an AnyCPU .dll by removing the 32Bit-flag. Here is how to do it:
- Copy the x86-.dll file into the Release folder under the bin folder of your project
- Copy the x86-.dll and .pri file into the Release folder
- open the Visual Studio Developer Command Prompt (type ‘dev’ into the start menu, it will appear there)
- type: corflags.exe /32bitreq- [path to Release folder]\[dll-Name].dll
- the result should look like this:

If you have additional files like xaml files, you would need to add a new folder in the uap10.0 folder (with the same name that your project has). I’ll update this post and the sample once I have a matching sample at hand.
Creating and testing the package!
Now we are finally able to pack the NuGet package. As we have the Developer Command Prompt already open, lets change the running directory to match the NuGet folder in our project. All we then need to do is to run the pack command of the nuget.exe that we already placed in there:
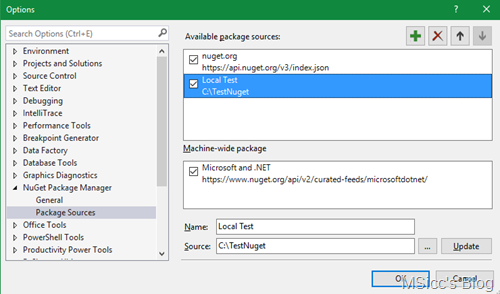
And that’s it. We have our NuGet Package in place. Now let’s test our package, before we are going to upload it to nuget.org. All you need to do is to have a folder for your NuGet packages on your machine. I made a folder called ‘TestNuget’ on mine, and copied the package into it (which is the same as the Nuget push command we’ll see later).
To add this folder as package source, open the ‘Options’ menu in Visual Studio and select ‘Package Sources’ in the NuGet Package Manager entry. Hit the add symbol on top and add your folder:
Now if you open the Package Manager and select your local folder as source, you will be able to install and test your package:
Publishing the package to nuget.org (or your NuGet server)
The final step is to publish the newly generated package to nuget.org or your own NuGet server. As we still have the Developer CMD opened, we simply use the following command:
1
 nuget push [path to your package.dll] [nuget.org API Key]
Another alternative would be to use the nuget.org website to upload the package: https://www.nuget.org/packages/upload (the page is self explanatory).
That’s it, your NuGet package is available for all you consider to use it. I also updated the sample of my last blog post on GitHub to include these changes, if you want to play around.
Some of you may go a different route for some steps. I have found this a good way that is also kind of memorable (for me). I would love to hear feedback on this and to discuss this, so feel free to leave me a comment.
Like always, I hope this post is helpful for some of you. Happy coding, everyone!


