WPDEV: smooth SplashScreen transition for your Windows Phone app
Today I finished an update for one of my apps with adding a CustomControl as SplashScreen. I had to do it this way because my app is localized in English, German and Italian. Most annoying at this part was that there is no smooth transition between the SplashScreen and the MainPage. By the way, there is also no smooth transition with the “normal” SplashScreenImage.jpg that is included in all app templates of Visual Studio 2010.
I often use the transitions that are built into the Silverlight for Windows Phone Toolkit (download here or use the Nuget-installer of Visual Studio). These transitions can be modified and used for custom transitions. I will show you how to create a fade out effect for your custom SplashScreen control.
First we have to create a project. I called the sample SplashScreenTransition.
The first thing we have to do is to create two classes: CustomTransition.cs and SplashScreenTransition.cs.
Let´s have a look on the first class, CustomTransition.cs:
1
2
3
4
5
6
7
8
9
10
11
12
13
14
15
16
17
18
19
20
21
22
23
24
25
26
27
28
29
30
31
32
33
34
35
36
37
38
39
40
41
42
43
44
45
46
47
48
49
50
51
52
53
54
55
56
57
58
59
60
61
62
63
64
65
66
67
68
69
70
71
72
73
74
75
 namespace SplashScreenTransition
{
    public class CustomTransition : ITransition

    {
        Storyboard storyboard;

        public CustomTransition(Storyboard sb)
        {
            storyboard = sb;
        }

        // these are used by the transition

        public void Begin()
        {
            storyboard.Begin();
        }

        public event EventHandler Completed
        {
            add
            {
                storyboard.Completed += value;
            }
            remove
            {
                storyboard.Completed -= value;
            }
        }

        // not used for SplashScreen, but needed to create the whole animation
        // if you don´t add these, you will not be able to build your project

        public void Stop()
        {
            storyboard.Stop();
        }

        public void Pause()
        {
            storyboard.Pause();
        }

        public void Resume()
        {
            storyboard.Resume();
        }

        public void SkipToFill()
        {
            storyboard.SkipToFill();
        }

        public void Seek(TimeSpan offset)
        {
            storyboard.SeekAlignedToLastTick(offset);
        }

        public void SeekAlignedToLastTick(TimeSpan offset)
        {
            storyboard.SeekAlignedToLastTick(offset);
        }

        public ClockState GetCurrentState()
        {
            return storyboard.GetCurrentState();
        }

        public TimeSpan GetCurrentTime()
        {
            return storyboard.GetCurrentTime();
        }
    }
}
As you can see, we create a new Storyboard which will hold our transition. We use the ITransition interface that comes with the Toolkit.
When I was creating my first custom ITransition, I was running into several issues. We are effectively using the Begin()-Method and the Eventhandler Completed. But we have to implement all other Methods to get this class working.
Now let´s have a look to our second class, SplashScreenTransition.cs:
1
2
3
4
5
6
7
8
9
10
11
12
13
14
15
16
17
18
19
20
21
22
23
24
25
 namespace SplashScreenTransition
{
    public class SplashScreenTransition : TransitionElement
    {
        public override ITransition GetTransition(UIElement element)
        {
            Storyboard FadingStoryBoard = CreateStoryBoard(1.0, 0.0);
            Storyboard.SetTarget(FadingStoryBoard, element);
            return new CustomTransition(FadingStoryBoard);
        }

        private Storyboard CreateStoryBoard(double from, double to)
        {
            Storyboard result = new Storyboard();
            DoubleAnimation animation = new DoubleAnimation();
            animation.From = from;
            animation.To = to;
            Storyboard.SetTargetProperty(animation,
                new PropertyPath(UIElement.OpacityProperty));
            result.Children.Add(animation);
            return result;
        }

    }
}
With the code above we are connecting the animation itself to an UI-Element. To get this working, we need to create a simple opacity fading Storyboard which we connect to an UIElement. We connect the Storyboard to the GetTransition-Method by overriding it. What we get is our CustomTransition.
Now the only thing we have to do is to display the animation, which gets a bit tricky.
Create a new User Control. I added a a TextBlock and an Image to the sample.
Important:
- set the value of d:DesignHeight to 800 (to cover the whole screen)
- put your Image/TextBlock into a Stackpanel and set the Background. If you do not, the Background will be transparent and your MainPage will be visible
To display the custom SplashScreen and its animation, we have to create a Popup and a BackgroundWorker:
- declare the names of both in your PhoneApplicationPage:
1
2
3
4
5
 public partial class MainPage : PhoneApplicationPage
    {
        // declaration of BackgroundWorker and Popup
        BackgroundWorker bgWorker;
        Popup SplashPopup;
- next step is to add a new Popup which holds our SplashScreen-UserControl and start our BackgroundWorker:
1
2
3
4
5
6
7
8
9
10
11
 // Constructor
        public MainPage()
        {
            InitializeComponent();

            //calling Popup, using our UserControl

            SplashPopup = new Popup() { IsOpen = true, Child = new SplashScreenControl() };
            bgWorker = new BackgroundWorker();
            RunBackgroundWorker();
        }
- Last but not least we have to get our BackgroundWorker to do some work and display the transition:
1
2
3
4
5
6
7
8
9
10
11
12
13
14
15
16
17
18
19
20
 private void RunBackgroundWorker()
        {
            bgWorker.DoWork += ((s, args) =>
            {
                Thread.Sleep(5000);
            });

            bgWorker.RunWorkerCompleted += ((s, args) =>
            {
                this.Dispatcher.BeginInvoke(() =>
                {
                    SplashScreenTransition SplashScreenTrans = new SplashScreenTransition();
                    ITransition transition = SplashScreenTrans.GetTransition(this.SplashPopup.Child);
                    transition.Completed += delegate { this.SplashPopup.IsOpen = false; };
                    transition.Begin();
                 }
            );
            });
            bgWorker.RunWorkerAsync();
        }
If you would display only the SplashPopup, you would only set IsOpen to false. But we want to get the Fading out effect, so we call a new SplashScreenTransition. Then we connect our custom transition to ITransition of the Toolkit and let the transition begin.
Essential is the delegation of the Completed Eventhandler. If you do not set the IsOpen of SplashPopup to false, the Popup remains open. That would result in a non-responding app.
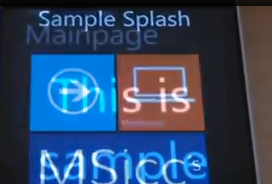
The result of the work done above will look like this:
I hope this article was helpful for creating a smooth transition of your SplashScreen.
Download the sample code here.