How to use and customize “pull to refresh” on Telerik RadDataBoundListBox
If you are following me and my development story a little bit, you know that I am building a new app (ok, it’s RTM already).
I wanted to add a manual refresh button to my MainPage, but there was no place left on the AppBar. So I started thinking about alternatives. As I am using a lot of Telerik controls, I found something that perfectly suits my needs: RadDataBoundListBox .
Wait… what?
You read it right, I am using a ListBox that holds only one item. The reason is very easy: It has the “pull to refresh” feature built in. But it is not all about adding it and you are fine.
The first thing we need to do is to set the “IsPullToRefreshEnabled” property to “True”. Honestly I don’t like the controls arrow as well as I wanted to remove the time stamp line on it.
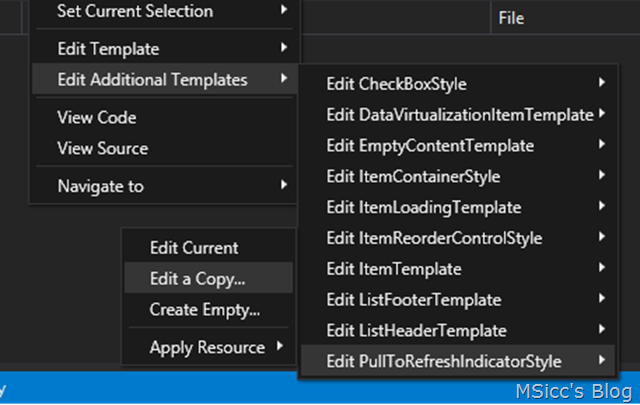
Luckily, we are able to modify the control’s style. Just right click on the RadDataBoundListBox in the designer window and extract the “PullToRefreshIndicatorStyle”.
After choosing whether you want the new Style to be available only on one page or in your app over all, name the new Style as you like. This will add the XAML code as a new style to your application/page resources. Now the fun begins. The first thing I changed was the arrow.
To do this, I added the beloved metro arrow in a circle (go for the “ContentPresenter with the name “PART_Indicator””) – done:
1
2
3
4
5
6
7
8
9
10
11
12
13
14
15
16
17
 <Viewbox xmlns="https://schemas.microsoft.com/winfx/2006/xaml/presentation">
<Grid>
 <Grid Name="backgroundGrid" Width="48" Height="48" Visibility="Visible">
   <Path Data="M50.5,4.7500001C25.232973,4.75 4.75,25.232973 4.7500001,50.5 4.75,75.767029 25.232973,96.25 50.5,96.25 75.767029,96.25 96.25,75.767029 96.25,50.5 96.25,25.232973 75.767029,4.75 50.5,4.7500001z M50.5,0C78.390381,0 101,22.609621 101,50.5 101,78.390381 78.390381,101 50.5,101 22.609621,101 0,78.390381 0,50.5 0,22.609621 22.609621,0 50.5,0z" Stretch="Fill" Fill="#FFF4F4F4" Name="Stroke" Visibility="Visible" />
     </Grid>
       <Path Data="F1M-224.887,2277.19L-240.615,2261.47 -240.727,2261.58 -240.727,2270.1 -226.173,2284.66 -221.794,2289.04 -202.976,2270.22 -202.976,2261.47 -218.703,2277.19 -218.703,2235.7 -224.887,2235.7 -224.887,2277.19z" Stretch="Uniform" Fill="#FFFFFFFF" Width="26" Height="26" Margin="0,0,0,0" RenderTransformOrigin="0.5,0.5">
         <Path.RenderTransform>
             <TransformGroup>
                <TransformGroup.Children>
                  <RotateTransform Angle="0" />
                     <ScaleTransform ScaleX="1" ScaleY="1" />
                 </TransformGroup.Children>
              </TransformGroup>
          </Path.RenderTransform>
   </Path>
</Grid>
</Viewbox>
No we are going to remove the time stamp. If you simply delete the TextBlock, you will get a couple of errors. The TextBlock is needed in the template. What works here is to set the Visibility to Collapsed. As the control has different Visual States, we need to set the Visibility of every occurrence of “PART_RefreshTimeLabel” in every state to collapsed. Finally we need to do the same at the TextBlock itself to hide the time stamp line.
Ready… or not?
Now we have our style ready to be used, right? Let’s have a look how it looks when we are using our control right now:
As you can see, the behavior of the Pull to refresh – control is not like expected. In this state, we have to throw it up first, then it will recognize the pull gesture. To get rid of this, we need to adjust two additional things.
The first thing we need to do is set the “UseOptimizedManipulationRouting” property to “False”.
Second, after setting the ItemsSource of the RadDataBoundListBox, we need to bring the first item into view. You can do this very easily:
1
 RadDataBoundListBox.BringIntoView(ItemsSourceName.First());
After that, we have finally a customized and smooth Pull to refresh function on our RadDataBoundListBox:
At this point I want to give a special thanks to Lance and Deyan from Telerik for their awesome support on this case.
Happy coding everyone!

