How to create an Extended Splashscreen for Universal Apps
Recently, I started to create a real world app to demonstrate the usage of my WordPressUniversal library. While I was working on it, I also decided to extend the Splahscreen which is mandatory for universal apps.There are several reasons to extend the splash screen, the most obvious is to hide initial data loading.
The only sample I found had a separate solution for the Windows and the Windows Phone application, and I decided to put them together to use the advantages of the Shared project that comes with every universal app.
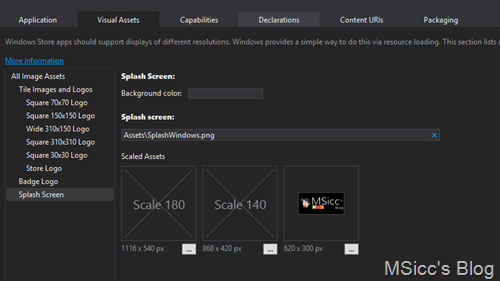
The first step is to add your Splashscreen images to both projects. To do so, open their Package.appxmanifest files and go to the ‘Visual Assets’ tab. Add your images:
Now add a UserControl to your shared project and rename the control type to “Grid” in the XAML file. After that, let us design the UI that is shown to the user when he starts our app:
1
2
3
4
5
6
7
8
9
10
11
12
13
14
15
16
17
18
19
20
21
22
23
24
25
26
27
28
29
30
31
32
33
34
35
36
37
38
 <Grid.RowDefinitions>
    <RowDefinition/>
    <RowDefinition Height="180"/>
</Grid.RowDefinitions>

<!--Windows needs a Canvas-->
<Canvas x:Name="Win_Splash_Img"
        Grid.Row="0"
        Grid.RowSpan="2"
        Visibility="Collapsed">
    <Image x:Name="extendedSplashImage_Win"
           Source="Assets/SplashScreen.png"/>
</Canvas>

<!--Windows Phone needs a Viewbox-->
<Viewbox
    x:Name="WP_Splash_Img"
    Grid.Row="0" Grid.RowSpan="2"
    Visibility="Collapsed">
    <Image x:Name="extendedSplashImage_WP"
           Source="Assets/SplashWindowsPhone.png"/>
</Viewbox>

<!--this StackPanel holds our ProgressRing that is telling the user we are doing some work-->
<StackPanel
    Grid.Row="1"
    HorizontalAlignment="Center">
    <ProgressRing x:Name="progressRing"
                  IsActive="True" Margin="0,0,0,12"
                  Foreground="White"
                  Background="Black">
    </ProgressRing>
    <TextBlock x:Name="progressText"
               Style="{StaticResource TitleTextBlockStyle}"
               TextAlignment="Center"
               HorizontalAlignment="Center">
 </TextBlock>
</StackPanel>
This XAML code is the base for our extended Splashscreen. It defines a row height of 180 to place the StackPanel that holds the ProgressRing at the bottom of our control. The main difference here is that Windows Apps use a Canvas while Windows Phone uses Viewbox to hold our Splashscreen Image. We need to set the Visibility on both to collapsed as our code decides which one will be displayed on Launch.
In our code page, we have a bit more work to do. Let’s go through it step by step:
Make sure you have added the following Namespaces:
1
2
3
 using Windows.ApplicationModel.Activation;
using Windows.UI.Core;
using ExtendedSplash.Common;
Note: if you do not have a Common folder in your Shared Project, you can add it manually and copy the classes from the demo project attached to this project. Don’t forget to change the Namespaces of the classes to your project name after you added them.
The next step is to declare some objects that we need for the extended Splashscreen:
1
2
3
4
 internal Rect splashImageRect;
internal bool dismissed = false;
internal Frame rootFrame;
private SplashScreen splash;
The Rect is used to place the Splashscreen Image in it and will be sized by our code which we will add later. The dismissed bool is used to determine when the system Splashscreen gets dismissed. The rootFrame is used for the navigation to our first application page, while the splash is used to read the needed values for placing our image into the Rect.
After we have declared those objects, we need to overload the main class of our control:
1
 public ExtendedSplash(SplashScreen splashcreen, bool loadstate)
The splashcreen tells us the coordinates and the height of the splash image. You can use the loadstate bool to determine data that needs to be restored by the SuspensionManager, if needed.
As users are snapping our apps or rotating the device, we need to handle this. To do so, we need to add the following line to our constructor:
1
 Window.Current.SizeChanged += new WindowSizeChangedEventHandler(ExtendedSplash_OnResize);
Add this code to handle the resizing:
1
2
3
4
5
 if (splash != null)
{
    splashImageRect = splash.ImageLocation;
    PositionImage();
}
If the user causes the WindowSizeChanged event to fire, the splash will be loaded again and submits new coordinates to our splash object. To properly handle the positioning, we are using the PositionImage() method:
1
2
3
4
5
6
7
8
9
10
11
12
         void PositionImage()
        {
#if WINDOWS_PHONE_APP
            extendedSplashImage_WP.SetValue(Viewbox.HeightProperty, splashImageRect.Height);
            extendedSplashImage_WP.SetValue(Viewbox.WidthProperty, splashImageRect.Width);
#else
            extendedSplashImage_Win.SetValue(Canvas.LeftProperty, splashImageRect.X);
            extendedSplashImage_Win.SetValue(Canvas.TopProperty, splashImageRect.Y);
            extendedSplashImage_Win.Height = splashImageRect.Height;
            extendedSplashImage_Win.Width = splashImageRect.Width;
#endif
        }
As you can see, we use the preprocessor directive WINDOWS_PHONE_APP to declare the height and width of the Viewbox. If it is not running on Windows Phone, we are setting the canvas coordinates and size via this method. This is not the only point where we need this method, as you will see later in this post.
Let’s go back to our constructor and add this line to load the system’s Splashscreen values into our object:
1
 splash = splashcreen;
Now that we have these values, we are finally able to receive the coordinates and declare which Splashscreen will be used:
1
2
3
4
5
6
7
8
9
10
11
12
13
14
15
16
17
18
19
20
21
22
23
24
25
             if (splash != null)
            {
                //handle the dismissing of the system's splash
                splash.Dismissed += new TypedEventHandler<SplashScreen, Object>(DismissedEventHandler);

                //get the system's splashscreen values
                splashImageRect = splash.ImageLocation;

                //decide which control is used to display the splashscreen image and size the progressRing
#if WINDOWS_PHONE_APP
                Win_Splash_Img.Visibility = Visibility.Collapsed;
                WP_Splash_Img.Visibility = Visibility.Visible;
                progressRing.Height = 50;
                progressRing.Width = 50;

#else
                Win_Splash_Img.Visibility = Visibility.Visible;
                WP_Splash_Img.Visibility = Visibility.Collapsed;
                progressRing.Height = 70;
                progressRing.Width = 70;
#endif
                //position and size the image properly
                PositionImage();

            }
Let me explain what I have done here. First we need to check if our splash object has a value. Then, we need to handle the Dismissing of the system’s Splashscreen with this TypedEventHandler:
1
2
3
4
 private void DismissedEventHandler(SplashScreen sender, object args)
{
    dismissed = true;
}
After that, I am declaring when to show Windows Phone’s Viewbox and Windows’ Canvas as well as setting the size of the ProgressRing. The last step is to position and size the image again with our PositionImage() method. This will cause the app to switch to our extended Splashscreen.
Now we have to declare a new Frame instance and begin to load our data:
1
2
3
4
 // this frame acts as navigation context
rootFrame = new Frame();
//start loading your data:
LoadData();
For this demo, I used a delay to keep the ProgressRing spinning:
1
2
3
4
5
6
7
8
9
 async void LoadData()
{
    progressText.Text = "sleeping, please wait until I wake up...";
    //using a delay to keep the progress ring spinning for this demo
    await Task.Delay(TimeSpan.FromSeconds(5));
    //Navigate to the first application page after all work is done
    rootFrame.Navigate(typeof(MainPage));
    Window.Current.Content = rootFrame;
}
That’s all of the code we need inside our ExtendSplash control. If you now build the project, it will compile, but nothing will happen. other than going directly to the MainPage.
We need to add some additional code to our App.xaml.cs in the OnLaunched event:
1
2
3
4
5
6
7
8
9
10
 //only show the splash if the app wasn't running before
if (e.PreviousExecutionState != ApplicationExecutionState.Running)
{
    //check the loadstate if necessary
    bool loadState = (e.PreviousExecutionState == ApplicationExecutionState.Terminated);
    //create a new instance of our ExtendedSplash
    ExtendedSplash extendedSplash = new ExtendedSplash(e.SplashScreen, loadState);
    //declare our extendedSplash as root content
    rootFrame.Content = extendedSplash;
}
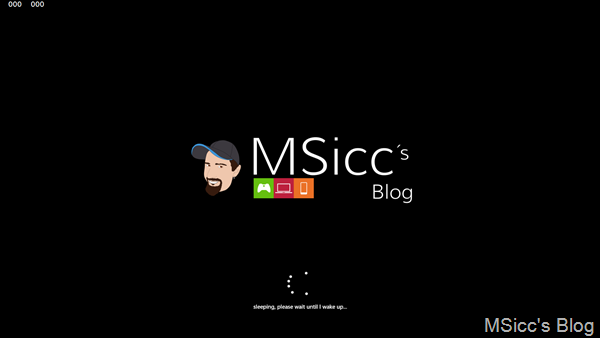
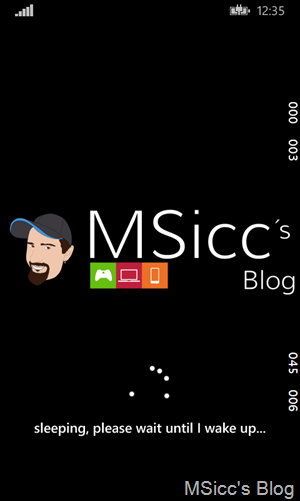
If you hit the debug button, you should have similar results to these:
For your convenience, I created a small demo project. Download it here.
As always, I hope this blog post is helpful for some of you. If you have questions or feedback, feel free to leave a comment below.


