Getting productive with WAMS: about the mpns object (push data to the user’s Windows Phone)
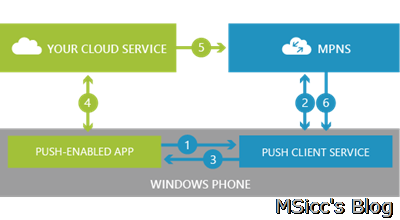
When it comes to Mobile Services, there are a lot of things you can do with the user’s data. One of them is to update the Live Tiles of their apps as well as send them Toast Notifications. To understand how the mpns (Microsoft Push Notification Service) is working, please see the image below and read this article on MSDN: https://msdn.microsoft.com/en-us/library/windowsphone/develop/ff402558(v=vs.105).aspx
Windows Azure has a pretty basic example to get the Live Tiles updated: https://www.windowsazure.com/en-us/develop/mobile/tutorials/push-notifications-to-users-wp8/. However, this example sends the data from the app to Azure and directly back to the user’s device. It is a good start if you want to understand how it works, but it does not reflect the most common scenario: the server is fetching data with the app closed on the users device.
The most important part: getting a valid push channel from the Push Client Service
Now that we know how the push notification service works, we need our Windows Phone app to acquire a valid push channel. This is done by a few lines of code in App.xaml.cs. First, we need a globally declared push channel:
1
public static HttpNotificationChannel pushTileChannel { get; set; }
With this global variable we are now able to get a valid push channel into our app and to our Mobile Service:
1
2
3
4
5
6
7
8
9
10
11
12
13
14
15
16
17
18
19
20
21
public static void AcquirePushChannel()
{
    pushTileChannel = HttpNotificationChannel.Find("msicc-test");

    if (pushTileChannel == null)
    {
        pushTileChannel = new HttpNotificationChannel("msicc-test");

        pushTileChannel.Open();

        //this binds the push notification to your live tile
        pushTileChannel.BindToShellTile();

        //this binds the push notification to toasts
        pushTileChannel.BindToShellToast();
    }

    IMobileServiceTable<pushChannel> pushChannelTable = App.MobileService.GetTable<pushChannel>();
    var channel = new pushChannel { Uri = pushTileChannel.ChannelUri.ToString() };
    pushChannelTable.InsertAsync(channel);
}
The Find(“desiredNameOfChannel”) method creates or finds a channel exclusive to your app and should be the same for all of your users. The Open() method finally opens the connection from your app to the Push Client Service. To automatically receive the updates for Tiles and Toast, we use the BindToShellTile() and BindToShellToast() methods.
Important for images:
You need to allow the url(s) the images can be from. To this, you need to add the desired uri in the BindToShellTile() method. If you have more than one uri the images come from, just create a Collection of Uri and add them to the BindToShellTile() method overload. Please note that only the top level domain needs to be allowed (specifying folders is not supported).
1
2
3
4
5
6
7
public static Collection<Uri> allowedDomains =
    new Collection<Uri> {
                        new Uri("https://yourmobileservice.azure-mobile.net"),
                        new Uri("https://yourseconduri.com/")
                        };

pushTileChannel.BindToShellTile(allowedDomains);
But that’s not all. We need to add the push channel uri also to our Windows Azure table to update the users data. This what the last three lines of codes are for. I highly recommend to separate the push channel table from your user data table, to be able to operate easily on this table. In order to avoid duplicate channels (which can be very annoying for users and yourself), we should update our server side data script:
1
2
3
4
5
6
7
8
9
10
11
12
13
14
function insert(item, user, request) {

   var channelTable = tables.getTable('pushChannel');
        channelTable
            .where({ uri: item.uri })
            .read({ success: insertChannelIfNotFound });
        function insertChannelIfNotFound(existingChannels) {
            if (existingChannels.length > 0) {
                request.respond(200, existingChannels[0]);
            } else {
                request.execute();
            }
        }
}
This way, you are all set up for updating your app’s Live Tile and for Toast Notifications. But until now, our Mobile Service does not send any data to our app.
How to update Live Tiles and send Toast Notifications from Mobile Services
Once our server side code has fetched all data, we certainly need to update our user’s Live Tiles or even send Toast Notifications. We are able to send the following types of Tiles and Notifications:
The FlipTile is the coolest of all and has the most options you can use. That’s why I choose it over the ‘normal’ Tile. To get the data out to our users, we are using this code:
1
2
3
4
5
6
7
8
9
10
11
12
13
14
15
16
17
18
19
20
21
22
23
24
25
26
27
28
29
30
31
32
33
34
35
36
37
38
39
40
41
42
//call the push channel table

var channelTable = tables.getTable('pushChannel');

//send toast and Tile:

channelTable
    .where({user:userid})
    .read({
        success: function(channels){
            channels.forEach(function(channel)
                {
                    push.mpns.sendToast(channel.uri, {
                        text1: ToastText1,
                        text2: ToastText2
                        }, {
                    success:function(pushResponse) {
                        console.log("Sent toast: ", channel.id, pushResponse);
                    },
                    error: function (error){
                        console.error("error in Toast Push Channel: " +  channel.id, error)
                    }
                });
                push.mpns.sendFlipTile(channel.uri, {
                     backgroundImage: backgroundImage,
                     backTitle: backTitle,
                     backContent: BackContent,
                     smallBackgroundImage: SmallBackgroundImage,
                     wideBackgroundImage: WideBackgroundImage,
                     wideBackContent:  WideBackContent,

                }, {
                    success:function(pushResponse) {
                        console.log("Sent tile:" ,  channel.id, pushResponse);
                    },
                    error: function (error){
                        console.error("error in Push Channel: "  channel.id, error)
                    }
                });
            });
        }
    });
Like you can see, we are using quite a few fields in the mpns object payload. You can click on the types above to see which fields are supported on each type.
Images that you send to your users are sent need to be a valid url to the image. The maximum size is 80 KB. If your Images are bigger, they will not be sent!
The mpns object has both a ‘success’ and an ‘error’ callback. The error callback is automatically written to the log. However, it is very hard to identify which id is causing the error in this case. That’s why you should implement it in the way I did above. This way, you know exactly which id is causing an error and which id received their update correctly.
We are also able to add some extra functions to respond to the success and error callbacks. I still need to do this on my WAMS, and I will write about the measures I took in the different cases once I did it (I only started using Azure a few month ago, so I am also still learning). If you are interested, here is a list with all possible response codes for the mpns object: https://msdn.microsoft.com/en-us/library/windowsphone/develop/ff941100(v=vs.105).aspx#BKMK_PushNotificationServiceResponseCodes
Conclusion
Like you see, Windows Azure Mobile Services allows us to send out updates to the user very easy within less than an our for setting it up. There are a few things we need to take into account – in fact, most of this points took me a lot of time to find out (as it is the first time I use push in general). As always, I hope this post is helpful for some of you.
Until the next post, happy coding!

