Why do I need to take control over the back button behavior?
The back button is available on Windows, Android and under certain conditions on iOS. It is one of the key navigation hooks. While the implementations vary between platforms, the functionality is always the same – go back one step in navigation. Sometimes, we need to execute actions before going back, like notifying other parts of our application or even blocking back navigation because we need to perform actions on the local page (think of a WebViewthat has internal navigation capabilities for example). While we do need only a few lines to intercept the hardware back button on Android and UWP, the software back buttons on Android and iOS need some additional code.
Xamarin.Forms – View and ViewModel implementations
Based on the code we have already written in the past posts of this series, we are already able to get events pretty easy into our ViewModel, utilizing the EventToCommandBehavior approach. To get them into our ViewModel, we will throw an own created event. You can do so pretty easy by overriding the OnBackButtonPressed()method every Xamarin.Forms pages come with:
protected override bool OnBackButtonPressed()
{
    base.OnBackButtonPressed();
    BackButtonPressed?.Invoke(this, EventArgs.Empty);

    //return true; //breaks navigation
    return false; //executes navigation
}
Depending on the boolean you will return here, the back navigation will be executed or not. The next step is to pass the event into our ViewModel, like we have done already with the ViewAppearingand ViewDisappearing events before:
private void XfNavContentPage_BindingContextChanged(object sender, EventArgs e)
{
    if (this.BindingContext is XfNavViewModelBase @base)
    {
        this.Behaviors.Add(new EventToCommandBehavior()
        {
            EventName = "Appearing",
            Command = @base.ViewAppearingCommand
        });

        this.Behaviors.Add(new EventToCommandBehavior()
        {
            EventName = "Disappearing",
            Command = @base.ViewDisappearingCommand
        });

        this.Behaviors.Add(new EventToCommandBehavior()
        {
            EventName = "BackButtonPressed",
            Command = @base.BackButtonPressedCommand
        });
    }
}
As you can see from the snippet above, the next step is to add the BackButtonPressedCommandto our base ViewModel. There is nothing special on that, so here we go:
private RelayCommand _backButtonPressedCommand;

public RelayCommand BackButtonPressedCommand =>
    _backButtonPressedCommand ?? (_backButtonPressedCommand = new RelayCommand(ExecuteBackButtonPressedCommand, CanExecuteBackButtonPressedCommand));

public virtual void ExecuteBackButtonPressedCommand() { }

public virtual bool CanExecuteBackButtonPressedCommand()
{
    return true;
}
And that’s it, if you just want to get informed or handle back navigation on your own. However, from some of the projects I have worked on, I know that I may need to prevent back navigation. So let’s extend our code to reach that goal as well.
Blocking back navigation
Back in our base class implementation, let’s add a BindableProperty. This boolean property makes it very easy to block the back navigation (no matter if you’re doing so from a ViewModel or a View):
public static BindableProperty BlockBackNavigationProperty = BindableProperty.Create("BlockBackNavigation", typeof(bool), typeof(XfNavContentPage), default(bool), BindingMode.Default, propertyChanged: OnBlockBackNavigationChanged);

private static void OnBlockBackNavigationChanged(BindableObject bindable, object oldvalue, object newvalue)
{
    //not used in this sample
    //valid scneario would be some kind of validation or similar tasks
}

public bool BlockBackNavigation
{
    get => (bool) GetValue(BlockBackNavigationProperty);
    set => SetValue(BlockBackNavigationProperty, value);
}
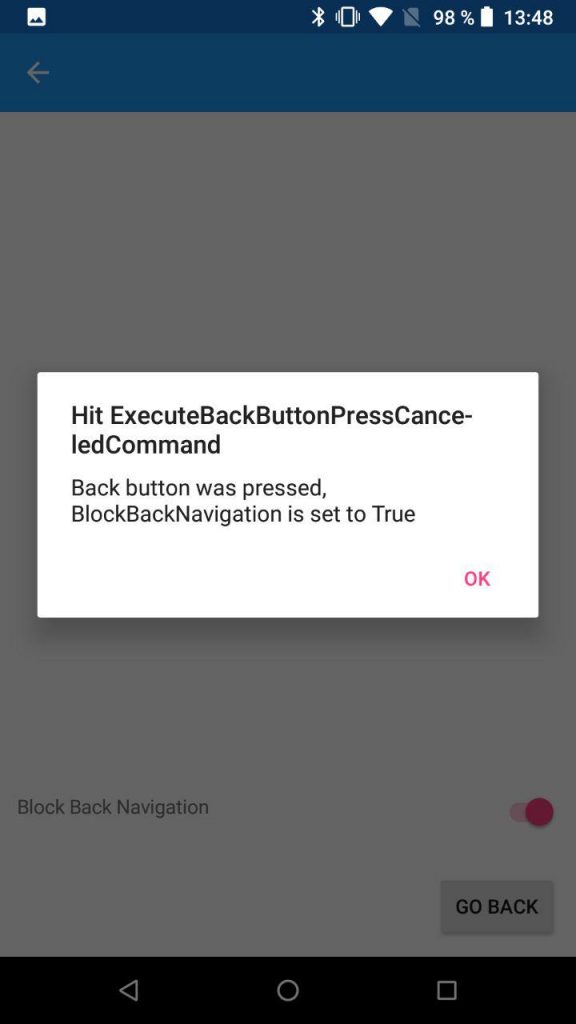
The next part involves once again the already overridden OnBackButtonPressed() method. If we are blocking the back navigation, we are throwing another event:
protected override bool OnBackButtonPressed()
{
    if (this.BlockBackNavigation)
    {
        BackButtonPressCanceled?.Invoke(this, EventArgs.Empty);
        return true;
    }

    base.OnBackButtonPressed();
    BackButtonPressed?.Invoke(this, EventArgs.Empty);

    if (this.StackState.isModal)
        return true;
    else
    {
       return false;
    }
}
Notice that I added an additional step for modal pages. Without that, the hardware button back press code will be executed twice on Android on modal pages. Of course, we are rooting also the BackButtonPressCanceledevent into our ViewModel, so let’s add it to our BindingContextChanged handler:
private void XfNavContentPage_BindingContextChanged(object sender, EventArgs e)
{
    if (this.BindingContext is XfNavViewModelBase @base)
    {
        this.Behaviors.Add(new EventToCommandBehavior()
        {
            EventName = "Appearing",
            Command = @base.ViewAppearingCommand
        });

        this.Behaviors.Add(new EventToCommandBehavior()
        {
            EventName = "Disappearing",
            Command = @base.ViewDisappearingCommand
        });

        this.Behaviors.Add(new EventToCommandBehavior()
        {
            EventName = "BackButtonPressed",
            Command = @base.BackButtonPressedCommand
        });

        this.Behaviors.Add(new EventToCommandBehavior()
        {
            EventName = "BackButtonPressCanceled",
            Command = @base.BackButtonPressCanceledCommand
        });
    }
}
To complete the code, we need to add a boolean property and the BackButtonPressCanceledCommand to our base ViewModel implementation:
private bool _blockBackNavigation;
private RelayCommand _backButtonPressCanceledCommand;

public virtual bool BlockBackNavigation
{
    get => _blockBackNavigation;

    set => Set(ref _blockBackNavigation, value);
}

public RelayCommand BackButtonPressCanceledCommand =>
    _backButtonPressCanceledCommand ?? (_backButtonPressCanceledCommand = new RelayCommand(ExecuteBackButtonPressCanceledCommand, CanExecuteBackButtonPressCanceledCommand));

public virtual void ExecuteBackButtonPressCanceledCommand() { }

public virtual bool CanExecuteBackButtonPressCanceledCommand()
{
    return true;
}
And that’s it. We already implemented everything we need in our Xamarin.Forms project.
Platform implementations
As often, we need to write some platform specific code to make our Xamarin.Forms code work in all scenarios.
Universal Windows Platform
As the Universal Windows Platforms handles the back button globally, no matter if you’re on a PC, tablet or a phone, there’s no need for additional code. Really. It’s already done with the Xamarin.Forms implementation.
Android
For the part of the hardware back button on Android devices, we are already done as well. But Android has also a software back button (eventually), which is in the toolbar (pretty similar to iOS). There are two options we can use for Android. The first one involves just one line of code in our base page implementation’s constructor:
NavigationPage.SetHasBackButton(this, false);
This will hide the software back button on Android (and iOS as well). It would be perfectly fine on Android because all (phone and tablet) devices have a hardware back button. However, often, we do not have the possibility to go down the easy route. So let’s fully handle the toolbar button. It does not involve a lot of code, and it’s all in the MainActivity class:
protected override void OnPostCreate(Bundle savedInstanceState)
{
    var toolBar = FindViewById<Android.Support.V7.Widget.Toolbar>(Resource.Id.toolbar);
    SetSupportActionBar(toolBar);

    base.OnPostCreate(savedInstanceState);
}


public override bool OnOptionsItemSelected(IMenuItem item)
{
    //if we are not hitting the internal "home" button, just return without any action
    if (item.ItemId != Android.Resource.Id.Home)
        return base.OnOptionsItemSelected(item);

    //this one triggers the hardware back button press handler - so we are back in XF without even mentioning it
    this.OnBackPressed();
    // return true to signal we have handled everything fine
    return true;
}
The first step is to override the OnPostCreate method. Within the override, we are just setting the toolbar to be the SupportActionBar. If we would not do so, the more important override OnOptionsItemSelected would never get triggered. The back button in the toolbar has the internal resource name ‘Home’ (with a value of 16908332). If this button is hit, I am triggering the hardware back button press handler, which will get code execution routed back into the Xamarin.Formscode. By returning true we are telling Android we have handled this on our own. And that’s all we have to do in the Android project.
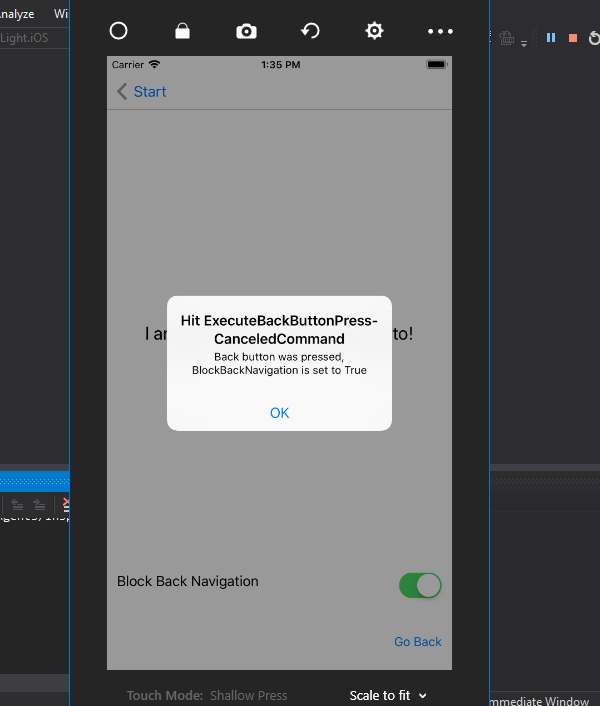
iOS
On iOS, a custom renderer for our XfNavContentPage is needed to get the same result. I was trying a few attempts that are floating around the web, but in the end this post was the most helpful to reach my goal also on iOS. Here is my version:
[assembly: ExportRenderer(typeof(XfNavContentPage), typeof(XfNavigationPageRenderer))]
namespace XfMvvmLight.iOS.Renderer
{
    public class XfNavigationPageRenderer : PageRenderer
    {
        public override void ViewWillAppear(bool animated)
        {
            base.ViewWillAppear(animated);

            //making sure to use this only with non-modal pages
            if (Element is XfNavContentPage page && this.NavigationController != null)
            {
                var thisPageIndex = page.Navigation.NavigationStack.IndexOf(page);
                if (thisPageIndex >= 1)
                {
                    //disabling back swipe complettely:
                    this.NavigationController.InteractivePopGestureRecognizer.Enabled = false;

                    var backarrowImg = UIImage.FromBundle("arrow-back.png")
                        .ImageWithRenderingMode(UIImageRenderingMode.AlwaysTemplate);

                    var backButton = new UIButton(UIButtonType.Custom)
                    {
                        HorizontalAlignment = UIControlContentHorizontalAlignment.Left,
                        TitleEdgeInsets = new UIEdgeInsets(11.5f, 0f, 10f, 0f),
                        //we need to move the image a bit more left to get closer to the OS-look
                        ImageEdgeInsets = new UIEdgeInsets(1f, -8f, 0f, 0f)
                    };

                    //this makes sure we use the same behavior as the OS
                    //if there is no parent, it must throw an exception because something is wrong
                    //with the navigation structure
                    var parent = page.Navigation.NavigationStack[thisPageIndex - 1];
                    backButton.SetTitle(string.IsNullOrEmpty(parent.Title) ? "Back" : parent.Title,
                        UIControlState.Normal);

                    backButton.SetTitleColor(this.View.TintColor, UIControlState.Normal);
                    backButton.SetImage(backarrowImg, UIControlState.Normal);
                    backButton.SizeToFit();

                    backButton.TouchDown += (sender, e) =>
                    {
                        if (!page.BlockBackNavigation)
                        {
                            this.NavigationController.PopViewController(animated);
                        }
                        page.SendBackButtonPressed();
                    };

                    backButton.Frame = new CGRect(0, 0, UIScreen.MainScreen.Bounds.Width / 4,
                        NavigationController.NavigationBar.Frame.Height);

                    var view = new UIView(new CGRect(0, 0, backButton.Frame.Width, backButton.Frame.Height));
                    view.AddSubview(backButton);


                    var backButtonItem = new UIBarButtonItem(string.Empty, UIBarButtonItemStyle.Plain, null)
                    {
                        CustomView = backButton
                    };

                    NavigationController.TopViewController.NavigationItem
                        .SetLeftBarButtonItem(backButtonItem, animated);
                }
            }
        }
    }
}
Let me explain the snippet. On iOS, we do not have direct access to the back button events in the navigation bar. We are able to override the back button, though. The first thing we have to make sure is that there is a UINavigationControlleraround. This way, we are still able to use our base page class implementation and its features for modal pages. The next step is to create a button with an image (which needs to be bundled).
Of course, we want the button’s text to behave exactly like the OS one does. That’s why we are going to get the parent view. We can easily use the current view’s NavigationStackindex for that – as long as we do not have cross navigation but a continuous one. In this case, the page before the current page is our parent. If the parent’s Titleproperty is empty, we are setting the title to “Back”, pretty much the same like the OS itself does. If you want it to be empty, just add a Title to the page with ” ” as content. This works also if you do not want your MasterPagein a Xamarin.Forms.MasterDetailPage to have a visible title, btw.
The most important thing to note is the button’s TouchDownevent – which is why we are doing this whole thing. First, we manually navigate back in iOS via the PopViewControllermethod (if necessary). After that, we are once again invoking our Xamarin.Formsimplementation via the SendBackButtonPressed method of the Xamarin.Formspage, which will then trigger our EventToCommandBehavior we implemented earlier.
The last step is to create an UIViewcontainer for the button and assign it as a UIBarButtonItemto the UINavigationController via the SetLeftBarButtonItemmethod the UINavigationItem provides. And that’s it, we now also have control over the back button on iOS.
Lust but not least, we need to handle also the swipe-back-gesture. This can be done the hard way by disabling the gesture completelly:
//disabling back swipe complettely:
this.NavigationController.InteractivePopGestureRecognizer.Enabled = false;
I do not have an implementation for handling that in a better way, but I will update the sample with another post in this series later on. At least I have full control over the back navigation, which is (for the moment) all I need.
As always, I hope this post will be helpful for some of you. I also updated the source code of my XfMvvmLight sample on Github to match this blog post. If you have feedback or questions, sound off below in the comments or via my social channels.
Until then, happy coding, everyone!


Thanks for the excellent strategy for working around the back button issue. Can you elaborate on how the back button image is layed out? I am having issues with getting it to render properly. To get the screen shot I simply took a screen shot on an iOS device and cropped it down to the back arrow. The width is just barely wider than the arrow. However when it renders with the custom code expands it wider than it’s displayed in the png.
Hi, I am using the ImageAsset structure in the meantime. This page gives the correct sizes for all screens: https://material.io/tools/icons/?icon=arrow_back_ios&style=baseline
Just add it to your iOS project and reference it accordingly.
Here is an actual sample that uses this strategy: